Showing posts with label card. Show all posts
Monday, October 8, 2012
Leaves captured
The leaves have changed from green into their vibrant autumn colors...and now they are dropping...quickly.
So, I thought I better quick make some cards to celebrate and capture this ever-changing season. Used my new Tim Holtz "blueprint" stamp of an oak leaf for the background and then added several colors and some clear embossing powder to highlight and pop the one on the corner. A few punches of my "Oakey Dokey" Fiskars squeeze punch and bonus points for digging out the sewing machine too! This was how I celebrated "World Card-Making Day" on Saturday. How did you participate?
Hope you get some time this week to "sit and watch the leaves turn". This season will be over before you know it.
Friday, August 3, 2012
how fashionable!
What is one to do when she doesn't have anything fashionable to wear? How about making a very chic' card to compensate?
Just wanted to share this versatile stamp with you from www.toomuchfunrubberstamps.com. Just stamp the image twice on a piece of paper (bottoms together as seen in the pic below).
Cut the image out (as one piece) and fold between the two bottoms. Then, the fun begins! It's time to decorate your purse!
I used embroidery floss and hand stitched on the stamped stitches. Then I added some ribbon trims, a chipboard mini-tag (attached with beads), and some felt, layered flowers with bead centers.
Making these cards is rather addicting...but, then aren't all crafts?
This would be so cute as a beach bag (with a towel sticking out), or a knitting bag (with needles and yarn sticking out), or, or...oh, I'm getting carried away!
My daughter has been stamping this image on piles of patterned paper to get ready to have her friends over for a card making party. This is one, I'm sure the girls will flip over (and me too)!
~Kelly
Thursday, July 26, 2012
Stamped and Embossed CAS card
You may or may not know that I tend to like the clean and simple (CAS) look. Sometimes I feel like it is a cop out, making a card with so much whitespace. This card is an example of how a CAS card can still have a lot of work and technique behind it.
I used a background stamp for the 'gingham' panel. The background stamp that I used was checks, so I tilted it a little to get the skewed look that I wanted. That meant that I had to tile the background stamp, because it wasn't large enough to cover the whole panel once it was tilted.
For the flowers, I stamped them with clearsnap clear embossing ink, then heat embossed them with white top boss embossing powder. I stamped and embossed 6 flowers, then I cut three of the petals out of 3 of the flowers and layered them with foam tape on top of the other flowers. I used my thumb nail on the back of the petals to create a curved shape. (do this carefully so that the embossed design doesn't come off)
I layered the white panel on red cardstock and then stamped the sentiment in black dye ink from stephanie barnard for clearsnap. Finally I adhered the flowers and added the jewels.
A simple clean card, with quite a few steps and techniques behind it.
Friday, June 22, 2012
Something new
As summer began and spring ended (officially on Wednesday), I was finishing up some spring cleaning by going through my junk, stash of goodies...embellishments and leftovers that end up in a box for me to use on my scrap. The box was getting a little bit full and I was determined to purge.
I usually describe my style as "a little bit of everything". This card is definitely a little bit of everything... it's like a "Where's Waldo".
I spy with my little eye...a doily, a butterfly, acrylic, satin roses, a tag, pearls, eyelet, burlap, tulle, leaves, and a bird. Did I forget anything?
Earlier this week, I got to play with Fiskars' new die-cutting and letterpress machine, The Fuse. I was impressed with how easily it cut through all different material including grunge board and 10 sheets of paper at one time! People were lining up to make mini-books!
Each shape, has interchangeable design plates (I used the clock plate seen on this card) that can be inked and then ran through the machine that die-cuts and letterpresses all in one swoop! Eventually, there will be tons of dies and designs, and large 12 inch dies to make boxes and bags. I can't wait!
It's always fun to play with something new!
And, who knows what you will find when you do a little cleaning?
~Kelly
Thursday, June 7, 2012
Watercoloring
This simple leafy stamp from Hampton Art was the perfect one to begin my first attempt at watercoloring with ink.
I used StazOn black ink on regular cardstock to stamp the background image. I gave my Distress Inks a squeeze (Peeled Paint and Evergreen Bough) to put a little color on the lid of the inks. With my waterbrush I just sloppily, randomly colored over the stamped image. When it was dry (with the assistance of my handy, dandy heat gun--because I'm an impatient artist), I colored some of the leaves with a Gelly Roll pen (by Sakura) in "clear star". The photos don't show the glimpses of sparkle that this adds to the card--it's really a dazzly delight!
Once I added the sticker sentiment, I was "rejoicing" that I have an original card to send to a friend who needs some happy mail.
As summer begins (last day of school/work is tomorrow), it's time to play in the water...watercolor that is!
~Kellystar
Labels:
card,
Distress Inks,
kellystar,
watercolor
Wednesday, May 16, 2012
Technique with multicolored stamp pads
Have you ever gotten a multi-hued stamp pad, or seen one, and wondered what you do with it? I'm pretty sure that there's a way to use just one color, but to be honest, I never tried. When I wanted to make a rainbow on this card though, I thought there had to be a way to use my rainbow ink pad to do it.
This is the ink pad that I have
So, what I did was carefully position my stamp over the red, orange and yellow portion, then dab as I moved the stamp (which is a lot longer than the ink pad) along the ink pad, careful to keep the colors more or less lined up. Then I stamped those three colors before going back for the next three colors. Since there is no purple here, I took a separate cat eye chalk ink pad and applied that over the red ink that was on my stamp from the previously mentioned process. The result? This fabulous gradient rainbow!! I was pretty happy with how it turned out! I can't wait to think of some more stuff to do with this ink pad!
Friday, April 13, 2012
Feeling lucky?
So, all of our neighbors and us went in on some Lotto tickets when the pay-off hit 600 million a few weeks ago. We were not lucky...unless you count $5 between 10 families lucky...50 cents each...hmmph.
However, I was feeling a little lucky when my mom surprised me with two new LUCKY 8 punches from We R Memory Keepers for my birthday. Actually, she is a HSN-aholic, and ordered them not really expecting them to be so big and heavy. She told me she had ordered some punches, but was going to send them back if I didn't want them. When I saw them, I swooned. I had been secretly wanting to see, try, and buy these. It was kismet. They became my birthday present!
The one that I used on this layout and card is called Lace Kerchief (I'll save the other one for another post). With 8 or less punches, I got the look of laser cut and shaped paper with paper I already had. For the layout about "my track star", I used just the outer cut on a 12x12 sheet of cardstock. I made a punch in each corner, then flipped the paper over and punched the opposite four corners. For the card, I used both the inner and outer cut combined on a 7x7 sheet (no need to flip for this size, just four quick punches and I was done).
Now, if I'm going to be picky (which I have a tendency to do), my only complaint is that I would have liked a crisper cut on my paper. I used a cardstock with a slight woven texture from American Crafts for both the layout and the card, and I can see some fray on both. Can I live with it? Yes. Should it happen? I don't think so.
Is it worth it to be able to create all of these paper shapes from a few punches?...I think yes. Is it a good birthday surprise?...I think yes. I'd like to hear your review if you've tried the Lucky 8 punches, and do you have a favorite shape?
~Kelly
Labels:
card,
page layout,
We R Memory Keepers
Friday, November 18, 2011
A Big Thank You with a Mini Card
Short on time? Make a short card! I was recently part of a mini-card swap and it got me thinking (sometimes that can be dangerous). But, it was so rewarding to get so many cards done in a short amount of time. And, I had to be extra-clever to see how many embellishments I could fit on such a small canvas. I wasn't going to make any Thanksgiving cards, but this mini one came together so quick and easy, it will be perfect to pop onto a bottle of wine. It's hard to tell from this picture, but it is only 2 inches x 2 inches in size. I used a small cornucopia Sizzix die and cut it on the fold (I placed the fold within the boundaries of the die so the fold doesn't get cut, thus creating the card). A little bling on the fruit (also a Sizzix die) and I am "thankful". Thankful that sometimes I can be satifsyingly quick!
I am thankful for many things...and I count Scrapstreet followers as one of those things to be thankful for. Thank you for the time you devote to commenting, the submissions you send us, and motivating us with your ideas. Have a wonderful Thanksgiving! ~Kelly
Labels:
card,
thanksgiving
Friday, July 29, 2011
Twue Wuv...
is what bwings us togedduh today.
(For those of you who are utterly confused as to why I might have a speech impediment, this is from the Princess Bride. If you haven't seen it yet, you are surely missing out.)
Want to know my true love? My true love when it comes to paper crafting? It's not a paper manufacturer. It's not an adhesive. It's a machine. I know about a handful of people who are reading this, raising their hands frantically yelling, "I KNOW! I KNOW!"
It's the Silhouette electronic cutting machine. Yes. And my love is quite unhealthy. I get a little sweaty in the palms and look around nervously when I'm not able to use it on projects. I fear the worst for my layouts and cards because they will not have the pleasure of having a shape cut from this most magnificent machine. Yes. My obsession runs deep. The one thing I've always known that would complete this relationship, is for the Silhouette to come out with a 12" machine. I knew that would seal it, stamp it, bind it and we'd be together for life.
You can imagine my reaction upon entering the Silhouette America booth at this past CHA when I noticed this most beautiful of machines sitting on a counter called the Cameo. It took me a minute to realize what it was. Suddenly, I felt my heart race, my eyes go wide, my mouth begin to open and that little lump appear in my throat. Clasping my hands and gasping I looked at the Sales man. Is it...? Could it...? I can't believe... OH my....
He got quite a chuckle out of me and my crazy, ridiculous response to gazing at the beauty of the brand new Silhouette Cameo. It cuts 12". Oh and it's beautiful. My heart still goes pitter pat talking about it. Want to see a photo?
Oh good heavens. There it is. *Sigh*
Yes. It is probably an unhealthy relationship but I don't care! I love my machine and all the awesome projects I can produce as we work together. The only thing I haven't done yet is name my machine. Will you help me? She needs a good name.
As far as the Cameo is concerned, release date is sometime in October with an msrp of $299.99. That's not bad. I'm game. Sign me up!
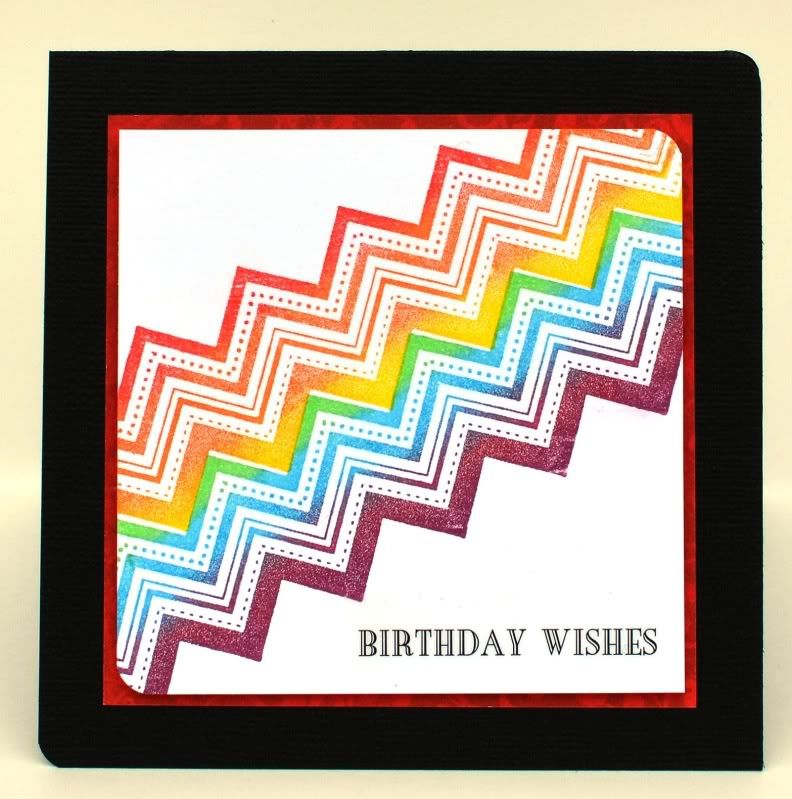
Here is a card I made recently using my SD just to show off how you can combine shapes and take advantage of the intricate designs that are part of the Silhouette library:
Paper, flair, stickers, rub-on, Alphabet: American Crafts, Cardstock: Bazzill Basics, Pen: Zig, Silhouette Shapes: card_with_swirls and layered_petal_flower
Thank you everyone for entertaining my infatuation with this machine. Crazy, unhealthy, manic as it is... I will always love my machine!
Until next time,
Labels:
card,
Silhouette Cameo,
Silhouette SD
Thursday, December 23, 2010
Make your own Holiday cards!
This year, I decided to make my own cards rather than buy them and I am going to share with you how you make your very own in no time! Forget about spending $1 per card and make your own!
Here's what I used:
Plain White Envelopes by Staples
Photo paper by Staples
Papers and embellishments
Black pen by Creative MemoriesStraight Trimmer by Creative Memories
Score blade by Creative Memories
Foam dots by Creative Memories
Tape runner by Creative Memories
Using your trimmer, cut a piece of pattern paper to 8-3/4x6-1/2".
Score the pattern paper at 4 1/2".
Attach a 4x6 photo to the front of the card.
Attach the embellishments as shown.


Once you've created the card, scan the card, crop out the background. Print the cards on photo paper and mail them out! This is a quick and easy solution for your Christmas cards and will only cost you about 10 cents per card after you buy your supplies, rather then spending a great deal of money on boring cards.
I love how my card turned out and I hope I inspired you in some way with this class!
Saturday, November 20, 2010
Adding Interest to Cards
While I don't find card-making to be the easiest task in the world, I have discovered a few tips that help me along in the process. First, add dimension with chipboard and/or pop-dots. Have a clear focal point or sentiment, and pay close attention to that area. Don't forget to add little details like buttons and pins. Adding special touches always makes any project look better. And, be sure to finish a card off with a ribbon or piece of twine. It is like creating a hand-tie gift, of sorts!
Here are some examples!
Happy card-making!!
Labels:
card
Wednesday, September 29, 2010
SAYING THANK YOU
I admit I am guilty of not saying thank you enough. An act of kindness - - regardless of how simple it is - - deserve a smile, a tap on the shoulder, some kind words...
Supplies: Papers: Upsy Daisy Designs, Pearl Pin: Maya Road, Ink: Ranger Industries, Pen: Sakura, Others: cardtock, twine. Tools: Border Punch: Fiskars.
Try saying thank you. It truly feels wonderful to say and mean it - - much more for the one who receives it.
janis
Supplies: Papers: Upsy Daisy Designs, Pearl Pin: Maya Road, Ink: Ranger Industries, Pen: Sakura, Others: cardtock, twine. Tools: Border Punch: Fiskars.Try saying thank you. It truly feels wonderful to say and mean it - - much more for the one who receives it.
janis
Labels:
card
Tuesday, July 20, 2010
TWINES ON CARDS
I'm not really a cardmaker, but from time to time, when I feel inspired I whip up some to give to friends abroad.
I have seen some great cards on galleries online where twines are used so I decided to try and use it on my card too. I think they give instant texture on your project - - and I'm all for texture fun!!!
Here's my card (as inspired by the colors of Color Combos Galore Challenge 151):
Supplies: Papers: October Afternoon, Nikki Sivils Scrapbooker, Cardstocks: Couture Cardstock, Button: BasicGrey, Chipboard Alphabet: American Crafts, Sticker Alphabets: Doodlebug Design, Jenni Bowlin Studio, Transparency: Hambly Studios, Stickers: Nikki Sivils Scrapbooker, Pen: American Crafts, Other: twine. Tools: Diecutting machine, Embossing Folder: Provocraft (Cuttlebug), Border Punches: Martha Stewart Crafts, Fiskars.
Hope you like it!
Have fun creating,
janis
I have seen some great cards on galleries online where twines are used so I decided to try and use it on my card too. I think they give instant texture on your project - - and I'm all for texture fun!!!
Here's my card (as inspired by the colors of Color Combos Galore Challenge 151):
Supplies: Papers: October Afternoon, Nikki Sivils Scrapbooker, Cardstocks: Couture Cardstock, Button: BasicGrey, Chipboard Alphabet: American Crafts, Sticker Alphabets: Doodlebug Design, Jenni Bowlin Studio, Transparency: Hambly Studios, Stickers: Nikki Sivils Scrapbooker, Pen: American Crafts, Other: twine. Tools: Diecutting machine, Embossing Folder: Provocraft (Cuttlebug), Border Punches: Martha Stewart Crafts, Fiskars.Hope you like it!
Have fun creating,
janis
Labels:
card
Thursday, June 24, 2010
80's Flashback
My daughter and I went shopping at a local mall a few days ago and I had a serious case of deja vu. On every rack, I saw buffalo plaid, neon splatters and metallics. I felt like I was back in 1984 doing my own school shopping!
They say that all styles make a comeback at some point, but I was surprised by some of the trends that I saw. While I can live without big hair and shoulder pads, some of the trends that I saw are fun to revisit. Plaid, for example, has gone through a lot of changes over the years, but has never really gone out of style. I saw lots of variations, from mini checks to buffalo plaid.
There was also a broad spectrum of colors gracing the racks. Lots of neon (who could imagine the 80's without neon?) and also lots of muted colors, like dusty purple. Shiny metallics embellished just about every accessory and piece of clothing that I saw.
Jumping on the 80's flashback trend, I decided to create a project that pulled some of these design ideas together. I pulled out an old plaid background stamp from Stampin' Up, inked it with Charcoal chalk ink, and stamped it on dusty purple cardstock. I used part of this for my background. Then I trimmed a strip, misted it with water and scrunched it up to make a ruffle for my card. Ruffles were everywhere at the mall, especially on plaid button-down shirts! This was the perfect embellishment for my 80's card.
I finished my card by adding "u rock" with puffy alphas, an over-sized blingy brad and some metallic stars trimmed from patterned paper. The result: a card appropriate for a trendy teen or your best friend from high school.
Subscribe to:
Posts (Atom)


