Wednesday, October 31, 2012

Happy New-vember to you!

Here I am blogging in the new month while answering the door to the cutest goblins and ghouls.  I love the photo opportunities that Halloween bring.  Facebook was just a treasure trove of great shots all day!

Our November mini mag is ready to inspire you as you sort through your holiday shots tomorrow morning.  Look at that gorgeous cover layout by Jennie Moll.  We love the way she wished herself into a cover girl.


This month we have a beautiful free kit from one of my personal favorite scrappers and designers.  I fell in love with the way Jen mixes colors before she started digital designing.  She has an absolute command of how hues work together.  Thanks for years of inspiration, Jen!  You can see more of her amazing creations in our issue and on her blog 6 Guys & a Gal.  Head over to see more and please remember to shout out thank you for her generous gift to all of us.


Downloads:             {one}  {two}  {three}
Please respect this generous gift and do not upload/share this kit.  Friends are welcome to download it here for the next month.  Thank you!

Last Call!
We are in our final days as a magazine.  Send your favorite layout in by November 10th and you could be a part of our farewell.   Please send your work to submissions@scrapstreet.com.


Friday, October 26, 2012

Something a little scary


For this Halloween project, I decided to make something a little scary for you! It was just a little scary for me too...I had never made a home decor collage project. Although, all scrapbook pages are sort of a collage, and I've made banners, this was different for me. Lots of steps and layers were a bit intimidating, and I placed and re-placed and positioned and re-positioned all of the elements a zillion times before I started gluing. I started by arranging (and re-arranging) an assortment of Halloween stamps onto my Fiskars stamp press as seen below.


Then, I stamped randomly on some white tissue paper using black Stazon ink.


I glued the tissue onto a thick piece of cardstock and then, I started inking with Tim Holtz Distress Inks and Stain...more randomness


I started punching and cutting...I spy with my little eye Fiskars Grandma's Doily, a small cloud (as clouds and ghosts), and a small bare tree.  I used my Fiskars Ultra Shape Xpress to cut the large tree from the Fiskars Woodland Tree Template.   And, I also used a Martha Stewart fence border punch as well as letters cut from a Sizzix Alpha die. The checkerboard-like, flocked paper for the tree is from My Mind's Eye.


Then the arranging and layer began (that part lasted a long time). Finally gluing.


This weekend, I'm participating in the 3rd Annual Fiskateers ORANGE Blog Hop! For more info about Fiskateers, and the blog hop, you can go to www.fiskateers.com/


Sunday, October 21, 2012

Paper Embellishments

Hello everyone! Today I am going to share a layout using lots of paper embellishments. While I was scrapping, I realized that I was running low on embellishments so I had no idea where this layout was going... I sort of went with the flow. I started by laying different papers down and stitching them together using my sewing machine. Then I placed the photo in the center of the layout and decided to use that as my focal point. From that point, I decided to print a digital embellishment and add that below my photo and I hand-cut the banner from patterned paper! I used a stamp and ribbon to fill in some white space and created a paper pinwheel to finish the layout!
Here are some close ups on how to create a pinwheel of your own:
Instructions for how to create a pinwheel:
1. Use 1 2 1/2"x2 1/2" Square as your base.
2. Using a paper piercer, poke a hole in the center of the square.
3. Using a pair of scissors, create cuts from each points towards the center leaving a small space in between.
4. Fold ends towards the middle, using glue dots to hold them in place.
5. Add a brad or die-cut to the center.
Supplies: Glitz Design "Afternoon Muse" Papers Glitz Design "Pretty in Pink" Digital Layered Sticker Glitz Design "Pretty in Pink" Digital Whatnot Epiphany Crafts Heart Epoxy Tool American Crafts Bloomers May Arts Trims in brown polka dots Catslife Press Stamp Dylusions Ink in bubblegum pink Creative Memories Heart Punch Creative Memories Circle Punch

Monday, October 15, 2012

Meet Bob

Meet Bob.

When I lived in Washington, I had the distinct pleasure of volunteering at a local coffee shop ministry. The purpose of the shop was to reach out to the downtown crowd. We would have lots of folks from the street come in for coffee; which they got for free after doing a chore. 

I love making coffee for people. I love chatting about life and learning about where people are from and what their story is. We had our fair share of regulars and one of those regulars is my pal Bob. I like Bob. He likes me, too. I would make his mocha every time I was working. He preferred my mochas too. Hey... I'm a mocha drinker... I know how they should be made. :o)
He always loved to drink from the ugliest mug. For awhile, we had this scary clown one that had a nose and all kinds of freaky details. Bob loved that mug. So, we'd hide it in the back of the cabinet to use when he came in. I always added a huge amount of whipped cream on top with a drizzle of chocolate. Maybe that's why he liked mine the best!

I miss working at this coffee shop. I miss seeing Bob every week and making his mocha. I miss hearing about his life and all the things he has seen and done. It's amazing how one, small blip in life can teach you so much. 


This layout is created using the October kit JOURNEY from Scrapbooking from the Inside Out. LOVE the emotion and LOVE the kit!


The flower is made from trim. So easy to create. Just roll 'er up!


Basic Grey yumminess and a close up of the journaling. Do you like my hash tags? Ha... (Yes I spend too much time on Twitter!)


SFTIO kits are the best! It's not just the latest and greatest... They are about being able to express yourself, your emotions, your thoughts, dreams, hopes and fears. I love working with these kits and focusing on the emotions each month. It's the best creative therapy and I'm a better person because of it. 


Wednesday, October 10, 2012

Using digital elements on your layouts

Hello ladies. Nicole here with a few fun layouts. For my first layout I decided to go hybrid again. I love the Happy Travels digital collection; it's one of my all time favorite collections. After I completed the layout, I found it funny how much it looks like a fall layout, but it's really a summer layout :) This was a super quick and easy layout. I simply printed all of the digital whatnots and labels on plain cardstock, printed them out and cut them to use as my background papers.
Supplies: Glitz Design: "Happy Travels" digital elements American Crafts: Cardstock American Crafts: Foam Alphas Zva Creative: Flower Zva Creative: Jewels Jenni Bowlin: Butterfly Punch Creative Memories: Corner rounder Gluedots: Adhesives Creative Memories: Pen/Adhesives And here is another layout where I used digital elements from the Happy Travels digital collection. I printed the transparancy swirl onto a letter  sized cardstock and used it as my base!  I am so impressed with the quality of my printer. You can hardly tell the difference from regular paper vs. digital.
 
Supplies:

Glitz Design: "Happy Travels"digital elements American Crafts: Cardstock American Crafts: Thickers Zva Creative: Jewels Zva Creative: Flower May Arts: Burlap Jenni Bowlin: Butterfly Punch Creative Memories: Corner rounder, Heart punch Creative Memories: Adhesives Creative Memories: Pen Thanks for visiting and please come back again! Hope you have a fabulous day!

Monday, October 8, 2012

Leaves captured


The leaves have changed from green into their vibrant autumn colors...and now they are dropping...quickly.

So, I thought I better quick make some cards to celebrate and capture this ever-changing season. Used my new Tim Holtz "blueprint" stamp of an oak leaf for the background and then added several colors and some clear embossing powder to highlight and pop the one on the corner. A few punches of my "Oakey Dokey" Fiskars squeeze punch and bonus points for digging out the sewing machine too!  This was how I celebrated "World Card-Making Day" on Saturday. How did you participate?

Hope you get some time this week to "sit and watch the leaves turn". This season will be over before you know it.


Pin It

Saturday, October 6, 2012

Happy World Card Making Day!

A day late...

Well, depending on where you are at. For some reading this post, it was yesterday. For others, it's still the afternoon. (Hello Hawaii!!!)

I LOVE World Card Making Day!

Of course, the writer of Card Corner would say that, right?  While, I was out and about most of the day, I did finally get to my craft area and am creating my happy creative heart out. I love this hobby so much and never want to lose that joy! I am so thankful for days like this when our amazingly, talented, paper crafting community can come together and share our cards.

While I was perusing galleries and Facebook, I came across some gorgeous cards! Some are from designers who are regularly published in ScrapStreet and others are from designers who I haven't had the honor of seeing their lovelies. See below for a few of what I found. Make sure to follow the link to their blogs because these ladies have a TON of inspiration on their blogs.

Designer: Angeline Yong
Her Blog

Designer: Christine Traversa
Her Blog


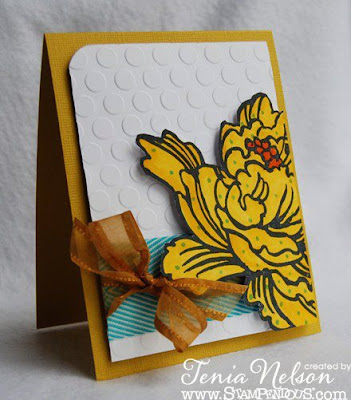
Designer: Tenia Nelson
Her Blog

Designer: Melissa Elsner
My Blog

Thank you Angeline, Christine and Tenia for, so graciously, allowing me to share your cards here. 

So... dear readers, did YOU get a chance to create any cards? Link up your gallery or your blog in the comments below so the rest of us card makers can come drool. :)

Card Corner Writer
(I'm going to miss ScrapStreet...)