Monday, February 28, 2011

Feeling Zen?

I am feeling all calm, cool, and collected after scrapping with the new March free kit from talented designer Aimee Harrison.  Ok, so the cool part may also come from the freezing temps outside today.  Even though my world is still snow covered, I know that by the end of March, I will see the first hints of a green spring just like the soft greens in Inner Bliss.  Scrapping with this kit is like an afternoon at the spa--soothing!  You can download it free all month long.  Thanks Aimee!


Downloads {elements}  {papers}   {papers2}
Please understand that this kit is for you to download and enjoy.  As with all of our freebies, you may NOT upload them and post them in any other location.  I know it seems horrible that I have to type this, but our site is being pirated with each freebie we post.  Please download with respect.  Thanks.

Ready for some inspiration?  First up the March ScrapStreet.com Magazine.  We focused on techniques this month with article after article to help you shake up your scrapping with new ideas and old favorites. Check it out:


Next, we have our latest issue of GingerScrapsStreet Magazine.  With ideas from fairy tales to bold banners, we have something for everyone.  Come and see!

Ready for a bonus freebie?  Our amazing friends at Persnickety Prints offered our readers a special gift--a free 12x12 print with no strings attached.  Just use the code scrapstreet at checkout.  If you have not used Persnickety Prints, you really need to give them a try--you will be more than satisfied!

We hope you have a super month!  May it be filled with peace and spring!

Friday, February 25, 2011

Cookie-stuffed Cookies from Serious Eats--seriously

It's Sara with a non-scrapping post for you. Although maybe you can scrap the goodies you make after reading this post!
Maybe you've already heard of the blog Serious Eats. It's wonderful! My husband, who loves to cook (*swoon*), sent me a link to these wonderful cookie-stuffed cookies, featured on the blog:
My daughter woke up this morning begging to make sugar cookies. Since the rodeo is coming to town, I figured "Why not?" and we made cookies shaped like Texas, cacti, cowboy hats and boots, and horses (couldn't for the life of me find the cow to substitute for a steer lol!). I know what you're thinking, "The rodeo is headed to town and your way of celebrating is by making COOKIES?" Well, I'm not actually from the South. This will be my first rodeo, so I celebrated the only way I know how: Sugar cookie dough and themed cookie cutters.

You know how, when you roll out sugar cookies, there's always a little bit of dough left? Well, I decided to use that little bit to make my own sugar cookie-stuffed cookie. :) My photo isn't half as scrumptious as the one pictured from Serious Eats, but I promise you that they were goooooood! So I'll show you my pic:
(Note the un-cut one in the back. My husband thought I'd literally just balled up the dough out of impatience! I should have let him keep thinking that, but instead I huffily told him "Those are the stuffed cookies you showed me!" Then he thought I was going to share with him. Yeah, right!)
I bought the Spring Oreos because they were on sale, and let me tell ya, even though I was expecting it, that little pop of yellow kind of threw me when I cut into the cookie! I added a tiny amount of mint extract to the dough before rolling it onto the cookies. Mm-mm, so good.
OK, now you go make your own treats. And then scrap the pics. Hopefully you can take more than one photo before devouring the cookie...which is what I did.
Cheers,
Sara

Thursday, February 24, 2011

Love for Stitching!!

I have an absolute LOVE for stitching on my layouts,
cards, and projects, but the simple truth is that I can
not stand the time that it takes to pick out a new color
and thread my machine every single time that I want
to stitch on a layout....not to mention that I can't drag
my sewing machine along with me to crops. So, I
do my stitching with my craft markers, yes that's
right, all of the stitching on every single project that
I create is done by drawing it on with all of my pens
and markers. I like this technique because of many
reasons. First of all I can take it with me, I have all
off the colors in the rainbow because I can use any
colored marker, and my designs are endless because
I can freehand them or use stencils to create my
stitching design. Here are a few examples of my
stitching that I've done on past layouts and projects.


To create this look, I simply use a thicker tipped
marker to draw on the dots that look like the holes


the needle would create. Then, I basically just play
connect the dots with a thinner tipped marker or
pen to create the look of thread. Simple as that!!

I hope you enjoyed my stitching technique!
Have a wonderful Thursday - Sarah

Wednesday, February 23, 2011

Wednesday Freebie

Hi everyone and welcome to the last part of the Cabin Fever Mini Kit. Some of the elements from the full kit for you to add to your papers and alpha.


You can download it here until next week when we will have a new freebie for you to download. Sorry link expired.

We hope you enjoy it and link us up to your creations in the comments. Who knows we may just offer those of you who do the full kit for free!

The full kit will be available at GingerScraps at the end of next week for those who may want all of it or missed the other parts.

Tuesday, February 22, 2011

Happy 1st Birthday to my little man!

I really can't believe a year has gone by! It seems like just yesterday I was telling my ScrapStreet Sisters that Edward has arrived! They know what a rough journey it was for me to have a baby but in the end, a miracle happened... and I was blessed with the most beautiful baby boy in the whole wide world.


I just love this picture of Edward and I. We truly had a blast celebrating his first birthday which fell on Presidents Day. Sure we could have waited to have his birthday party on the weekend but for his first birthday, I wanted to have his birthday party on his actual birthday!

I'm looking forward to another exciting year watching my little man grow.

Hope your having a fabulous day!
Nicole

Monday, February 21, 2011

Getting Over It....

Hi everyone Casey here to share a little insight on imperfection, confidence and getting over it!!

There are times that I have confidence issues.  Confidence in how I am as  Mom, how I look and even how my scrapping looks.  I suppose most women share this common bond of wondering are we, our actions, and our projects good enough.  As I get older I find myself having less of these thoughts...perhaps it is because I have less time to dwell or I am finally embracing imperfection.  This is a hard lesson for a self-confessed perfectionist to learn...so I am taking a class to help!  Well it is a class to help me as it applies to my scrapping!  Karen Gurnberg  from Big Picture Classes is leading a free workshop, Embrace Imperfection, and it is enlightening.

Sometimes I look at my pages and think ICK!  My photos are not good enough, my style is lacking, I don't have a knack for design, Scrapper X's layouts are prettier than mine...blah...blah...blah!  Well, I am here to tell you that I will always nit pick my layouts and they will never be perfect but what they will be is treasured.  After a couple of weeks of class I have a renewed focus...to preserve the little moments that make up life.  Sure I want them to be pretty but am I going to let a 'bad' photo keep me from scrapping a great story or am I going to delete a layout because it does not look like it came from a magazine;)...NO!

My purpose for sharing this with you all is this...if you are letting self doubt hinder you from scrapping or enjoying your layouts take a second and remember why you scrap.  Is it to make perfect pages...or to make keepsakes that you and your family will treasure?  Do you really think that your grandchildren will care if you misspell a word in your journaling or if you don't match your colors perfectly?  I don't think so...I think they will be happy that Nana took the time to scrap all these great memories.

With all this in mind I scrapped some photos that I thought were fair at best.  Here is the layout I came up with...and to be honest I really like it.  Please ignore the hideous sweatshirt and PJ bottoms I am wearing...another reason I almost did not scrap these.  But then again who always dresses to the nines?


Be sure to check out Big Picture Classes!  There are always free classes going on and there are also other classes that require payment...they all look fun and helpful for all kinds of scrappers (digital or traditional).

Wednesday, February 16, 2011

Frosty Wednesday Freebie

Welcome to our normal Wednesday freebie this week! Seems like lots of you enjoyed the papers selected from the Cabin Fever Kit, so to go with those here is one of the alphas. As a bonus there are some word art alpha tiles with a blank one for your own sentiment.

Don't forget the link is only valid for the week, (the papers will be gone by Saturday, so get those quickly if you missed them). Stay reading the blog (which is very inspiring I have to say.) to pick up the selected elements for Cabin Fever.

You can get your copy here (sorry link expired). Enjoy and please show us your creations...

Oops... sorry the link is fixed now!

Tuesday, February 15, 2011

Trees!!!


Trees are still hot hot hot! Did you know that we have a call out for layouts that feature creative trees on them? Today I thought I'd share some trees with you. The layout above just uses a tree that I cut out. Here are some other trees I have done in the past:


I do hope you have been inspired to create a tree layout and submit it!!!

Already have one you would like to submit? Then send it our way!

Please send your work to submissions@scrapstreet.com.
Deadline is midnight February 27 for all calls.

The day after...

all out of love? overwhelmed with Valentines, hearts, red and pink and don't know where to begin? 
Well, I went old-school and did a little research for us. Oh, and all this love is for FREE! Have fun!


digital scrapbook kit:
http://scrapstreet.com/11gss/2febgs/digikit.htm


digital hearts:
heart border:
http://jeanmaries.blogspot.com/2010/01/free-digital-heart-border.html
heart frame digital stamp:
http://rubberstamping.about.com/od/digitalstamps/ss/heart-frame-digital-stamp.htm
digital scrapbooking kit "The Shape of Love":
http://graphicssoft.about.com/od/digitalscrapbooking/ig/The-Shape-of-Love/
round heart motif free digital stamp:
http://rubberstamping.about.com/od/digitalstamps/ss/Round-Heart-Motif-Free-Digital-Stamp.htm
graphics for your sweetheart:


heart-themed brushes:
grunge hearts: 
http://www.graphics-illustrations.com/grunge-heart-brushes-photoshop-download
PhotoShop heart brush set:
http://graphicssoft.about.com...photoshop-heart-brush-set.html
Valentine's Day preset collection:
http://graphicssoft.about.com/od/photoshopdownloads/ss/sksvalentine.htm
My Vintage Valentine - Free Valentines Photoshop Brush Set:
http://www.photoshopsupport.com/tools/brushes.html
Valentine's Day:
http://www.obsidiandawn.com/valentines-day-photoshop-gimp-brushes
Hearts:
http://www.obsidiandawn.com/hearts-photoshop-gimp-brushes
Hearts II:
http://www.obsidiandawn.com/hearts-ii-photoshop-gimp-brushes
Heart Brush Set:
http://www.easyelements.com/free-photoshop-brushes.html#heart
PhotoShop Heart brushes collection:
http://www.webresourcesdepot.com/photoshop-heart-brushes-collection/


fonts:
Fontspace:
http://www.fontspace.com/category/heart
http://www.fontspace.com/category/heart+rate
Fonts4Free:
http://www.fonts4free.net/holiday-valentine-fonts.htm
New Evolution Designs:
http://newevolutiondesigns.com/20-free-heart-font-downloads
Desktop Pub:
http://desktoppub.about.com/od/freefonts/l/bl_ffhearts.htm
Fonts & Things:
http://www.fontsnthings.com/holiday/valentine.shtml
Fontsy:
http://www.fontsy.com/theme_55.html


Monday, February 14, 2011

How to Recycle and Alter Your Valentine Candy Boxes in 8 Steps

Hi, it's Julie Ann bringing you a tutorial today on How to Recycle and Alter Your Valentine Candy Boxes! It's easy and fun, and good for the environment too!!! These are inspired by Lisa Kettell.


SUPPLIES
To start, you need a few supplies:
  • heart-shaped candy box
  • liquid adhesive (I used gel matte medium, and I also really love Fabri-Tac by Beacon)
  • pop-dots adhesive
  • digi printables- vintage valentines vignettes: I Heart You by Tangie Baxter (Scrapbookgraphics)
  • pen or pencil (for tracing)
  • scissors (one with fine tip is preferable)
  • vintage music paper or patterned paper of your choice
  • crepe paper aka streamers
  • flowers
  • wing and jewel (Prima Marketing, Inc) *optional
  • glitter
  • silver pipe cleaner or garland
  • ribbon
  • hole puncher or Crop-A-Dile

TUTORIAL


1. Trace on wrong side of music sheet paper or patterned paper around the heart, and cut out. Adhere to the top of the heart lid.
2. Add adhesive around the edges of  the heart on the paper.

3. Gather and scrunch/pinch the crepe paper together as you adhere it to the edges of the heart. Go all the way around the heart in this manner.

4. Adhere silver pipe cleaner or silver garland in a heart shape over the edges of the crepe paper where it meets the music paper. I find Fabri-Tac adhesive works best.
5. Sprinkle vintage glass glitter over the project and it will adhere to the glue left over from the pipe cleaner.

6. Adhere the three cut-out digi printable hearts, overlapping, as shown above, using pop-dots for dimension.

7. Embellish with flowers, a wing on the angel, and a jewel at the bottom tip of the heart.

8. I punched two holes, one on each side, of the candy box - with my Crop-a-Dile (or you can use a hole puncher). Pull ribbon through and tie a knot. It's now ready for hanging when you put both sides of the candy box together!
And here are a few others I've made this year for additional inspiration..........

Have a blessed and creative Valentine's Day!!!
xoxo,
Julie Ann Shahin

Saturday, February 12, 2011

Wednesday Freebie on Saturday

Welcome everyone to the Wednesday Freebie on Saturday this week! My schedule date appeared in the European format not the American one, so it was going to post on 09/02/11! LOL...

Still better late than never! I know a lot of you in the States and Canada have had loads of snow this winter (shuddering in horror!) It just seems to be lingering with the cold temperatures. We have only had a day of snow (about an inch), but believe me we are rarely to supposed to have ANY! It causes major problems on our roads in France, especially our hilly area, so hopefully that is it!

To cheer you up we have the papers from a kit aptly called Cabin Fever! There are 8 papers in this part. The rest of the kit will be available over the next two weeks, so be sure to get here each Wednesday from this week. You will not want to miss the darling robin wearing a crown in the elements part!

Here is the preview of this week's offering


Make sure to get it this week as the link will expire on Saturday 19th Feb. Enjoy and keep warm! Sorry link has expired.

Friday, February 11, 2011

Photographing kids and pets

It's Sara with a quick blog post about photographing children and pets. I was thinking the other day how I love to see the world "through my daughter's eyes." But if I stand up to take a photo of her straight on, then that's not really through her eyes...it's through mine. I want photos that reflect how she sees the world. Photographing children and pets present the same issue. We've got to...

Get down on their level!

I made some graphics to illustrate the difference in camera angles. Yes, these show just how awesome I am at making illustrations of people and babies. Which I guess also proves why I'm a writer.

OK, this first graphic illustrates the camera angle when we stand above the subject and take a photo:
Here's a photo to highlight the point:

But if we get down on the child's level, you see that same scene with the added advantage of seeing it through the child's eyes.
And the same scene, different camera angle:
Now we see her face better, and we can see that special bracelet she's working on. (How do I know it was special? She was making it for me!)

So the next time you set up the perfect shot, remember: camera angle. And if you're like me, try to remember if you've got any aspirin in the medicine cabinet. You'll want it to ease the back pain caused from kneeling on the ground!

Cheers,
Sara

Thursday, February 10, 2011

Accessorize with...Paper?

One of the things I love about papercrafting is that you can make almost anything out of paper -- even jewelry! In fact, over the past few weeks, I'm seeing paper jewelry ideas all over the blogosphere. Here are a few I wanted to share with you:

Still searching for that perfect Valentine's Day gift? Check out this little paper cuff bracelet on Etsy -- so fun!


And for a completely different take on a bracelet, check out these altered bangles from the Cosmo Cricket blog:


And here's a little tutorial on how to create a paper brooch from Paper-Source:


How about a cute necklace made from your paper scraps? The DIY wedding blog shows how to make one.


So next time you spot a piece of patterned paper that's just your style, try making an accessory you can wear outside your craft room. Maybe you can even make a gift for that "fashionista" friend!

Tuesday, February 8, 2011

Using What You Have

I collect boxes and baskets! I just can't help myself! When I receive packages
in the mail, boxes that are from Christmas or birthdays, baskets leftover from
gifts or garage sales, I collect them all!! I know when I see a good box or basket
that there will just be a fabulous way I can repurpose them and use them for
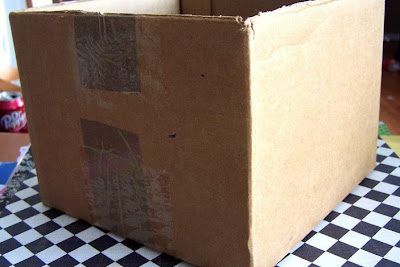
decoration, storage, or even better...decorative storage!!! Today I want to share
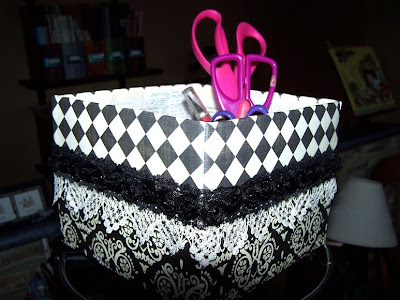
with you a simple square cardboard box that I repurposed for extra storage in
my scraproom. All it took was a little decorative pattern paper, ribbon, and lace.

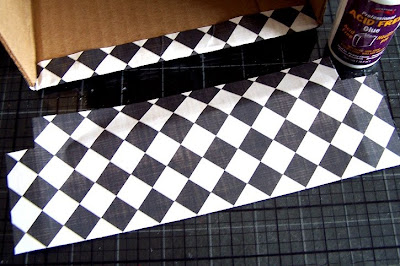
I first covered all four sides of the bottom half of the box with pattern paper
using a good craft glue. I covered two opposite sides first (ex. North and South
sides of the box) and wrapped the paper about and inch over the corners to
cover the corners of the box. Then on the two remaining sides (ex. East and
West sides of the box) I cut and glued the paper to fit perfectly from edge to
edge. This way the corners of the box are covered yet the seams are still
directly on the corner edges.


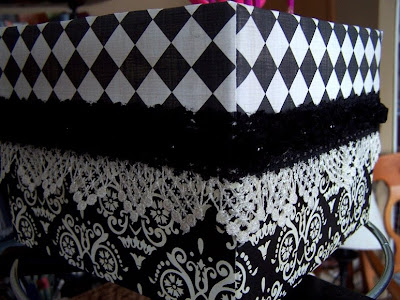
Next, I covered the top half of the box using the same technique. The only
thing I did differently here was to cut my paper about an inch taller than
what I needed for the box so that I could wrap the extra paper over the
top edge of the box to cover the raw edge. (NOTE: the lid flaps of the box
have been cut off to leave the top of the box open for storage)


Then I added lace and ribbon as a border to cover the line where the two
pieces of pattern paper come together.


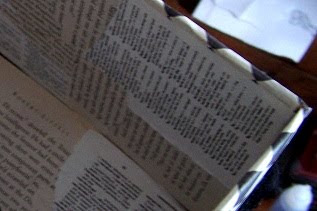
Lastly, I covered the inside of the box with vintage book and dictionary
pages. This is a very easy way to cover the inside of the box. There is no
rhyme or reason to the design and I just love the end result. I have seen
many people cover the back of antique shelves and cabinets with this
technique, and I figured that if it was good enough for an antique then it's
definitely good enough to finish the inside of my box!! You could also use old
newspapers, music sheets, or just about anything with black and white print.


I now use this decorative box to hold the items on my scrapping desk that I
use on a regular basis like my ink, scissors, adhesive, etc. These items used
to take up valuable space on my desk and now I just toss them into the box
until I need to reach for them again. There's no more searching under stacks
of paper and stickers trying to locate where I tossed my tape runner or
scissors. I also have another box that I repurposed and decorated to hold
my scraps and I just file them by color inside of the box.


I love to repurpose boxes and baskets for my scraproom storage. The best
part is that you can decorate your box in any style or color to match any
room and decor in your home. I've even created storage boxes for my
daughter's bedroom closet and toy shelves. The possibilities are endless!

I hope you'll give this a try! Have a wonderful Tuesday! -Sarah

Monday, February 7, 2011

Inspiration and Getting from Memory to Layout

Inspiration can be a very elusive thing.  Since, discovering digital scrapping in 2009 I have learned a lot but  I still consider myself a bit of a novice.  I struggle with inspiration and sometimes lean on templates for help.  Having no formal design training...except elementary school art...I do not feel bad about this.  I am still very pleased with the layouts that I make.  For me whole point scrapping is to preserve memories.  So getting from memory to scrapped layout is a rather free and loose process--template, page map, quick page, or original creation it does not matter to me.  Below are some of the resources that I use to start my layouts...I hope you find them helpful.

Page Maps:  Page|Maps Blog is a great resources for page maps and inspiration layouts. All sketches (maps) are free and the blog is updated regularly.  Here is an example of one of the maps available.

Gallery Inspiration:  I find that sometimes the best inspiration for a layout is browsing online scrapping galleries.  I frequent DigiShopTalk, Scrap Orchard, GingerScraps, and Scrapable.  Each one of these galleries provides a Search feature.  So if you have a specific topic that you want to scrap...just look it up to see how others scrapped it. Browsing a gallery or two may give you that creative spark you need.  But don't forget to credit the original layout in your credits if you 'lift' a layout from a gallery...good manners and also a big compliment to the original artist. Gallery browsing also helps me find digital goodies.  I can shop numerous stores at one time...that is if credits are present in the gallery uploads.

Templates:  As I admitted above I love templates.  Some scrappers feel guilty for using them...they feel they stifle the creative process.  For me they are the springboard that I need to get started.  Remember that templates are just a starting place.  You can delete layers, add elements that the template does not 'call' for, and really make the design your own.  So don't let the template 'stigma' take away the usefulness of these design tools.  Take a look at a recent layout that I made using a Simply Yin template  for my Project 52.  The template is basic giving only photo placeholders and drop shadows for the photos.  I embellished and journaled as I wished.


Digital Supplies: Kit:  Sweet Siblings by Stacy's Backdoor Door Designs and Sarah Bennet  (no longer available), Template: Template 186 by Simply Yin (SimplyYin Blogstore), Software: Adobe Photoshop Elements 9, Fonts: Impact Label Reversed, Underwood 1913.

Design Notes:  I am loving Project 52.  The details of our life that are being captured are great.

Journaling:  Week four was another great one here in Thompsonville.  Ella continued to walk more & more on her own.  This mean more exploring & learning about what is OK & what the big NO-NOs are.  Travis surprised Ella & I with fried pork chops & gravy for supper one night...might I say that man is an artist with a frying pan!  Later in the week Ella & I went with Nana & Shannon to Cracker Barrel.  While there Nana gave Ella coffee for the first time...she was not impressed at all.  Nana also ate lots of cherry pancakes & put five pounds of sugar in her coffee...wonder if the the dear Doc was watching?  Later that day I put together Nana & Shannon’s new kitchen island & Ella rode around in her wagon (Powered by Nana & Shannon).  Travis, Ella & I also found a new restaurant that we really enjoyed...Azariah’s.  Travis had Shepherds Pie for the first time. I made some the next night and he promises mine tasted best...he is such a sweet Husband!  Speaking of firsts Ella also had a first at Azariah’s...cucumber.  It was a hit!  Since, Ella is walking so well we decided it was time to put the Chicco walker away. It was a favorite for a while but Miss Ella just no longer needs it Sunday Travis surprised his girls again...pancakes for a second week.  We are getting so spoiled.  Then Ella took some time out to help me be the Marsupial Muffin Makin’ Mama...notice how she is inspecting my work over my shoulder.  One of her favorite thing to do is to come up behind me in Travis’s arms & then flop over onto my back.  Just like Yoda & Luke from Star Wars! 

Miss Ella also had one other first this week.  She instructed me to let her drink form a Big Girl glass with a straw.  She did great & there was no mess!  Oh & check out that pic of her playing with my heels.  Those are the shoes I wore at the Wedding.  She fished them out of the closet & proceeded to try the on.  She is growing up too fast. And on other Kodak moment checkout Miss E using the mouse (bottom left).  She is on her tip-toes sliding the mouse around & watching the screen!  Our Little Genius!  What a great week!


Challenges:  Another creative way to find inspiration is via challenges.  I recently started participating in my first ever Progressive Scrap.  This is where the challenge leader gives specific instructions on what to add to your layout in steps...you interpret these instructions and go from there.  Thus far it is a neat experience.  There are also challenges that are more topic specific...such as the Out My Window Challenge hosted at Scrappin Digi Kreations.  This challenge follows the same subject (person, plant, etc.) for twelve months.  You are able to note the changes over time...very cool idea.  I am doing our yard...we recently moved and the yard needs some work.  It will be neat to track it over the coming twelve months.

Hopefully the next time you are hitting that proverbial creative wall one of these suggestions will help get you over the hump!

Sunday, February 6, 2011

An angel moment

Ever have a day where you really need a nice note?  Just a little something that perks you right up?  One of my friends calls these angel moments--a time when God uses a random and unsuspecting person to deliver a much needed smile.  I love that description.

I spent the entire week sending out "Cease" emails to various sites.  For some reason, a person using the name GangaParker decided to take our freebies and those from many other designers, download them, and then upload them to many other sites in direct violation of our terms of use.  For those of you who might be new to the digi scrapping world, please know that this is illegal.  I have the right to give away my work for free--you do not.  You may use them, but NEVER upload and share any designer's kits.

In the middle of tackling this mountain--each kit posted in more than 25 places--I received the nicest email from Savannah O'Gwynn from the challenge blog All Things Unity.  She wanted to ask if it was ok if she used one of our freebies to make a graphic for her challenge this week--with appropriate credit this week.  Savannah showed her appreciation (as do all of  you who are kind enough to comment) for the hard work and talent that our designers share with all of our readers.  It really made my day!  Thank you so much Savannah!

As a matter of fact, I appreciated it so much that I immediately offered to share her challenge with all of you.  Here is her graphic using my Sweet Sunshine kit:


The challenge is easy enough since these stamps totally rock!  Want some more inspiration?  Take another look at our article on Unity Stamps in our January Issue.  I think I will pull out some of my favorite stamps and play along.  I love a good challenge and how can I resist one from my angel?

Want to join me? 
 

Friday, February 4, 2011

Using Actions with PSE9 to make your photos really POP

Good Morning Everyone
Jodi here today sharing some of my secrets with you
on how to make your photos really POP

I am relatively new to digital scrapbooking, but i am a keen ametuer photographer. So I thought i would share with you how i make my photos really POP using Actions for Photoshop Elements 9.


This is a photo that was taken by the local paper at the School Fete recently...
Its a lovely photo,
but a little dull and the background is a bit ugly.

Im a huge fan of Actions.  Rather than playing with lighting, contrast and colour ourselves, we can down load free Actions, or purchase them from Photographers.

So here is the original photo


I opened PSE9
and i have already a set of actions pre loaded into my program.
I purchased these actions through a photographer
that promotes his photography on FACEBOOK.
Its amaising what you can find on Facebook!

So I have loaded them up into the program
and i just click one button

You can see just a slight adjustment in this photo.
There is added contrast and the skin colour isn't as yellow...


Here is another type of action where there is a more old fashioned
finish to the photo.
This action is actually called Tombstone.... very fitting!!!


But this Black & White action is the one that i find i use the most.
It has added contrast.
The black is black and the white is white!!
I love that it really brings out the subjects in the photo and you dont even take any notice of the background.


Here is how i have used them in layouts....
Here is my favourite Black & White Action
"Fly Free"


Here is my favourite Colour Action
"Fete Fun"


And here is another Back and White Action
using January's Free Digi Download from Gingerstreetscrap Mag.
I love this line.....
"Snow Fairy"