Saturday, December 31, 2011

A New Year and A Challenge

Are you shaking your head and thinking to yourself, "Where did the year go?"  Well, that's what I've been doing for the past week or so.  

A few years ago, my mom gave me a big box of journals she and my dad had kept for years and years.  There are journals of every size and every color, the covers are getting tattered and torn, and the pages are yellowing.   Some of the days events are written by mom, others by dad, and some days they both wrote a page or so.  They wrote about things like the weather, who came to visit them, what my sisters and I and our families were doing, what they had for lunch or dinner, what they were thankful for and sometimes they wrote interesting tidbits they'd heard on the radio or read in a magazine.  It has been so much fun to read through the diaries ... to get a glimpse in to their daily lives ... to read what they felt was important enough to record.  Now that they are both gone, the diaries mean even more to me. 
Last January 1 I started to journal my life by taking a photo a day.  I also recorded little tidbits with the photos.  I posted them in my Facebook photo album and was able to take photos for 69 days in a row, but unfortunately, I stopped the project because my mom became very ill.  Plain and simple, I just didn't take the time to do it.
  With a new year rolling around, I'm going to try the challenge again ... Because even though I only have 69 days of photos to look back on from last year, it amazed me how many of the "little" things I had forgotten about until I saw the photos and read my journaling again (when I was preparing for this blog post).  

Will you challenge yourself to take a photo a day in 2012?  If not a photo a day, perhaps a photo a week?  I'm certain, that like me, at some point you will look back on your photo journaling journey and smile, and you'll be thankful you took the time to snap a photo and jot down the happenings of your day(s).

Wishing you all a blessed 2012!!!

Thursday, December 29, 2011

Mixed Media Canvas

Now that we are heading toward the New Year, my mind goes directly to my resolutions.  One of my resolutions is to clean up, simplify and make my scrap room pretty.  I think I get more creative when my surroundings are pleasant and clean.  So how about a little wall art?

I made these four "seasonal" 4x6 canvas art and left room for litle wallet size photos.  I will line them up on my wall and not only have something I made to look at but also photos that I cherish.


I have Spring, Summer Fall and Winter.  I used the Blick Studio stretched canvas on a 4x6 wood frame.  I first painted the canvas then I started layering stencils, paper, foam stamps, and rubons.


I made these little tags to mount my photos and I matched them to the canvas.


These dont take a lot of time because they are 4x6, and you can make them any theme you want.  For instance how about, Peace, Love, Happiness, and Art?  That is my wish for the New Year.


Wednesday, December 28, 2011

L is for Letterpress!

Hi everyone! I hope you all had a wonderful holiday. It's so fun to watch my kids get excited when they see all the toys Santa brought them. They are still at that age when Christmas is so magical. I remember those days and I love being able to relive them through my kids.

I got a toy for Christmas, too. It's the L Letterpress kit by Lifestyle Crafts. This cool tool allows you to do letterpress with your die cut machine. I used my Cuttlebug, but I think it works in most machines. The hubby bought mine from Amazon, but I think you can get them at scrapbook stores, too.

I've only had the opportunity to use it a few times, but so far I am "impressed." (Ha ha, get it? Impressed!) I had to play with it a little to get the image to come out the way I like it. I plan to play with it a little more and give a review of it later.

Here are a couple card I made with my new toy:


 Recipe: Paper: Lifestyle Crafts, Ink: Lifestyle Crafts, Memento, Stamp: Joy's Life, Tools: L Letterpress, Nestabilities, Cuttlebug, Embellishments: gems, pleated ribbon.


Recipe: Paper: Lifestyle Crafts, Patterned Paper: Bo Bunny, Stamp: Joy's Life, Ink: Lifestyle Crafts, Stampin' Up!, Tools: L Letterpress, Embellishments: Flowersoft, snowflakes, ribbon.

Sunday, December 25, 2011

Merry Christmas!

A very Merry Christmas to all of you from all of us at ScrapStreet!
We hope your holiday is full of good company, good food, peace, love and joy. 

In the spirit of this wonderful holiday, I wanted to share a super clean and simple card I made using the most awesome electronic cutting machine known to mankind. Okay. That is my own opinion. ScrapStreet does not endorse my opinion but they know full well how much I love my Silhouette SD. (The Cameo is coming for my birthday. Yay!)

So here we go...

One of the things that gets me every year is the need to make Christmas Cards. I refuse to buy them because I've got so much crap... I mean... beautiful things to make my own. The issue is getting my tush in gear and chaining myself to the crafty table and make them. You wouldn't think that would be a difficult thing. Considering how much I love paper crafting and making cards. But, for whatever reason, I always find other things to make or do around the house and then end up scrambling the week of Christmas. *sigh*

I decided to do one style of card this year. I've got my lovely Silhouette SD, so why not use it to it's full advantage? I can mass cut and mass produce! In my head I thought, "I'll just cut out a bunch of snowflakes, do a clean and simple card, and be good to go!"  But once I got started, I thought of other things to do to the card. I wanted to add ribbon and bling and strips and on and on and on and on. STOP! Eek! Why didn't this mojo appear at the beginning of December??? Nonetheless, I did end up making several cards and thought I'd share with you what I did because I love them. They are SUPER simple cards. Seriously.

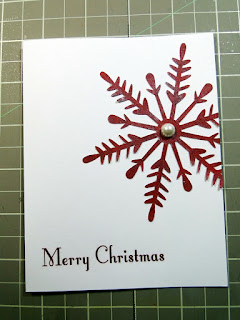
For the snowflake, I used the 1_snowflake_C00756_20509 shape from the Silhouette library. I cut them at about a 4" diameter.


After cutting, a bottle of pretty something caught my eye. Hmmm... Every snowflake needs sparkle don't you think?


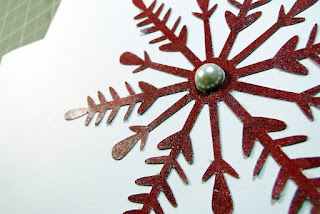
Yep. I busted open that Glimmer Glam and painted some frosting on each snowflake. LOVE the sparkle it gave the Lily Bee paper.


Because I'm impatient, I used my heat gun to dry up the Glam paint. Worked like a charm. To create a design showcasing white space, I adhered the snowflake off center.


Used the rub-ons from the Christmas Town collection by Lily Bee (same collection as the patterned paper) and added the sentiment.


To complete the look, I added a little pearl to the center of each snowflake.


And wah lah... a super simple Christmas card.


And lots of them.


You probably have your cards all done and sent by now so just store this for next year. :)

Again, MERRY CHRISTMAS!!!

Saturday, December 24, 2011

Chalk one up!


Today I want to introduce you to something totally different.  Loose power chalk.  Chalk-Ah-Lot Products sells loose power chalk and if you aren’t familiar with it, you soon will be.  This stuff is so wonderful for crafters and sure to be seen as a crafting staple.
There are 3 types of power chalks: 
Powder
These colors contain an additive which allows different shades to be created. The degree of change depends on the amount of chalk and pressure applied. Eight of the powder colors contain an additive which creates special effects, which includes wonderful streaks of color throughout your design.
Fluorescent
These colors are very bright brilliant colors.
Metallic
These colors provide a rich dazzle and shine. Stardust, our most popular metallic adds a special shimmer to any design. It can be added to any area or used to cover your whole design and give luster to the entire piece of art.
Power Chalk contains an additive which makes the chalk stay on the paper.  A fixative is not required when using the powder and dust colors.
The Metallic Chalk and Fluorescent Chalk do not contain the same additive as the powder chalk, therefore it does not require a fixative be used either over, under, or mixed in with it.
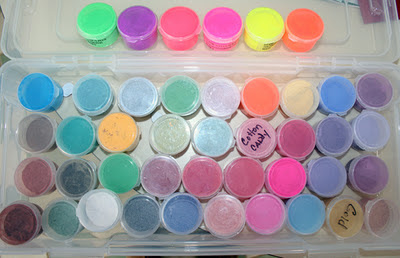
There are so many colors to choose from that you may want to pick a variety to play with.  This is a picture of all the colors which I happen to have.  Can you even believe the selection?  Check them out yourself at the website.  You get a very generous amount in each container.
The Stardust color (which is a metallic chalk) can also be used to create many metallic colors. By mixing 1 part Stardust with 2 parts of any powder, dust or florescent color, you can create a rainbow of metallic colors. Stardust can also enhance any of your matte pigment inks by lightly applying Stardust over the stamped image with a cotton ball while the ink is still wet. This will change any of your matte color pigment ink pads to a rich metallic color.

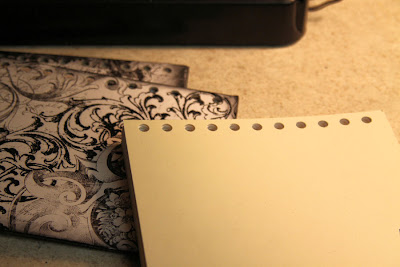
This is a close up to show you the texture.  Very fine and powdery.

Here are just a few ideas about the mediums you can mix with the chalks:  Elmer’s glue (white or clear), acrylic pants, Mod Podge, Ranger Inkssentials glossy accent or crackle accent, nail polish, bubble solutions... the ideas are endless.  Visit Buzz N Magic Powdered Chalk for additional details.  Beginning in January visit the Chalk-Ah-Lot Cafe blog for challenges and great prizes.

Happy Holidays!

Thursday, December 22, 2011

Pinecones for your tree


Even if the gift inside the box is store-bought, having a little home-made topper can make a good present, extra-special. These pinecone ornaments are just perfect for that. I learned to make them ages ago, and decided to add a few new ones to my collection this year. For the ornament above, I used paper from Bella Blvd.'s new Winter Wonder collection, called Ski Slopes.
To make your own, you will need...
-a small styrofoam egg
-pins
-paper (or ribbon) cut into 1" wide strips, then cut into 1 1/2" long
pieces. You will use about six, 1 inch strips.
-ribbon
-tacky glue
Fold the rectangles of paper to a point (not true triangles), as seen in the photo. Place each folded paper onto the egg, pinning at the two top corners.
The key to getting the pinecone shape started, is to pin 3 of the folded rectangles so their bottom points meet at the bottom of the egg (you can see this in the picture below). Then, you just keep going around pinning the pieces at each corner, covering the pins of the row underneath as you go.
Once you get to the top, slide the pins under the fold (see below).
Loop some ribbon on a pin (I used a pearl-topped headpin for this), making your first loop a big one so you can use it for hanging on the tree. Dip the pin in some tacky glue before sticking it into the top of the pinecone.
Here are a few I made with ribbon. They are hanging on the tree, just ready and waiting if I need to attach them to the top of a package.

I hope you have all of your shopping done and can take some time to sit back and relish in some holiday memories as they happen. Make sure you get some photos too!
Merry Christmas and Happy New Year!

Tuesday, December 20, 2011

An oldie but goodie~


Hi everyone~here is an oldie but goodie for sure!!! Remember foo-fa-la by Autumn Leaves?  I always loved this paper but it took me three years and counting to use it.  That is the way it happens sometimes, the paper you really like, you save it and it stays in a cabinet for no one to see. 


Here is a closeup of the banner under the photo.  I just cut them all different sizes and machine sewed them under the picture.  The flower is by Prima and the title is by American Crafts.  Here is wishing you all have a wonderful Holiday and the next time you will  hear from me, it will be 2012!!!! So until then ~

Monday, December 19, 2011

Tis the season

This season, why not try and use up those pretty holiday scrappy goodies to wrap your personal gifts in! With a little bit of paper, die cuts, bling, charms and twine, you could make those presents extra festive! I am loving the new holiday papers and embellishments by Creative Memories!! If you feel you need this collection, simply go to Creative Memories's website and get yours today!


Supplies used: Papers: Die cuts: Stickers: Creative Memories, Crystals: Zva Creative, Twine: Pink Paislee, Metal Charm: Epiphany Crafts, Button made with Button made with EC Button Studio Round 14”, Shape Studio Tool Round 14, Adhesives: Creative Memories.

Hope you're getting ready for the holiday season because it's coming!

-Nicole

Sunday, December 18, 2011

Book Gift Idea

One week from today is Christmas!  Are you scratching your head for a gift idea?  This hand made book would be great for last minute gift giving.

Here's a peak at the finished project


  And a quick overview of how I created it - 

I used Corel PSP X2 to create the pages for the address book (hint: save the file, because by making only a few minor changes, you can use the template for lots of different types of books).

All of the pages are printed on heavy weight card stock.  The alpha pages are printed on off white card stock and the address pages are printed on white card stock.


I started off with heavyweight cardboard chipboard measuring 6.25W x 5H.  I cut out 2 pieces of scrapbook paper (Bo-Bunny paper, from the Enchanted collection) to cover the front cover - then repeated the process for the back cover of the book.  (The card stock pages are just a tad smaller than the chipboard covers).


I put both covers under something flat and heavy and let them set overnight.
You can see in the photo below, the scrapbook paper is not setting perfectly on the chipboard.  That can be fixed easily by trimming off any excess (I use small scissors) and sanding down all of the edges (which also needs to be done for inking purposes in a later step).


Here is what the cover looks like after I've trimmed and sanded it down

 
I then inked all of the edges of the chipboard and inked slightly on to the edge of paper with Tim Holtz Distress Ink (I used Black Soot)


Time to punch the holes, put the book together and add the spiral to the top.  I use the We R Memory Keepers Cinch binding machine, however, if you do not have one, you can punch holes and use book rings to secure the book together.


I've added a Tim Holtz Idea-Ology Word key to the spiral (I've found it is easier to add any hanging embellishments before ribbons are tied on) and trimmed off excess ribbon.  

One of my favorite parts of making these books is digging through my ribbon stash to find just the right ribbons to tie on to the spirals. Using ribbons made of different materials, different widths and patterns gives a unique look to each book. 
Trim the ribbons to the desired length and you are done!!!

I hope you are able to use this as inspiration!  If not for Christmas, for any personal, handmade gift to give to someone special throughout the year!

(PS - more book projects and information is available on My BLOG)

Wishing you and your family a blessed holiday!!!

Saturday, December 17, 2011

A Christmas Freebie

For all our blog followers and magzine readers, a little add on kit by P'tit Studio Katia to the kit A Merryful Season.


A great kit for your holiday scrapping and which you can find here.


We hope you enjoy this freebie available for a week or so.
Download here and have a very Merry Christmas and a Happy New Year.

Friday, December 16, 2011

Holiday layouts by Nicole Martel

Hello everyone, Nicole here. Today I would like to share two Holiday layouts using pictures from last year. I'm not sure about you all, but I am not ready for the holidays! For my first layout, I decided to use a variety of products using our most recent collections. I love how this layout turned out. Notice how I sprayed snow flakes in the background using some chalkboard mists? They are subtle but they are there!


Here are a few close ups:


Supplies used:
Glitz Design Papers "Beautiful Dreamer Damask", "Vintage Blue Floral", and "Beautiful Dreamer Polka".
Glitz Design "Dance in sunshine" Big Rhinestones.
Glitz Design "Beautiful Dreamer" and "Vintage Blue" Word Epoxy Stickers.

Other: Gingerbread man punch: Creative Memories
Screen: Chalkboard mists: Glimmer mist: Tattered Angels
Thickers: American Crafts
Pen: Adhesives: Corner rounder: Creative Memories.

And for my next layout, I used all products from the "Vintage Blue" collection. I really love how this one turned out.


Supplies used:
Glitz Design "Vintage Blue" Papers.
Glitz Design "Vintage Blue" Big Rhinestones.
Glitz Design "Vintage Blue" Epoxy word stickers.
Glitz Design "Vintage Blue" Cardstock Stickers.
Glitz Design "Vintage Blue" Trims.

Other:
Pen: Corner rounder: Heart punch: Adhesives: Creative Memories.
Studio Button Tool Round 14: Epiphany Crafts.

I hope that you enjoyed your visit today. Please come back!