Wednesday, August 31, 2011

It's almost time!

Tick tock.  Tick tock.  The clock inches toward a new month so slowly.

I always love the first of the month, but September is my favorite for a very selfish reason--it is my birthday!  Six years ago, I gave myself the best present ever--ScrapStreet!  And that gift has given me more than I could ever have imagined.  Our official ScrapStreet Anniversary is still 2 weeks away.  Make sure to stop by on the 15th for prizes and fun!

Tick tock.

That clock is moving ever so slowly, but we can pass the time by sharing the new issue with you.  Our September issue of GingerScrapsStreet is full of ideas and inspiration for all types of scrappers.  Whether you are digi or paper, card or layout, we have something for you!  Check out September HERE.


We have the most gorgeous kit free for you this month from Snips and Snails Designs.  One of my personal favorite designers, Stephanne created this perfect fall kit just for all of you!  From apples for the teacher to apple picking to holiday apple pie, you can scrap this kit all fall long.  Head on over to her BLOG to see more of her amazing talent.


Downloads  {Paper 1} {Paper 2} {Elements 1} {Elements 2} {Notes
Please respect this generous gift and do not upload/share this kit.  Friends are welcome to download it here for the next month.  Thank you!

Are you ready to submit?  Find our current calls HERE and share your talent!

Next month, we will have the Fall issue of ScrapStreet.com Magazine and the October issue of GingerScrapsStreet Magazine.  Double the inspiration and double the fun!


Monday, August 29, 2011

Epiphany Crafts ~ Oval Button Studio!!


Thought I would share a new product with you that I really think is super cool and, of course, this super cute layout of my granddaughter driving the mule with  help from her "grandy"!
The product is the new oval epoxy buttons from Epiphany Crafts. They have that vintage feel to me so I love the look of them on my layouts!  Such a clever product~


Epiphany Crafts has many different shapes that fit in the custom button studio to make your own, one of a kind button embellishment!! The  Button Studio fits in the palm of your hand and is very user friendly~a big plus for me!!! I am on their design team and enjoy using their product very much! Have a wonderful day and thanks for stopping by!! by: C. Mercer

Thursday, August 25, 2011

Crafting with Kraft

I am a blank canvas girl. 

To start a scrappy project, I start with a white sheet of cardstock and my photos.  More often than not, I would keep that solid white as my base.  At least I did until two scrappy friends I love and admire introduced me to the wonderful world of kraft.

Stacey (It's Just Paper) and Jen (The Crazy Scrapbooker) both sang the praises of building with kraft.  They took the time to convince me that it really did work with all colors and added a depth that white does not.  And it photographs really well.

So I took the plunge.  In a big way.  I ordered a 25 pack of kraft cardstock and I dedicated 30 days to starting my creations with it.  Three years later, kraft is a good friend and I am still buying it in 25 packs. 

At CHA this summer, I fell in love with a relatively new company called Simple Stories.  Have you seen their items?  If not pop over to their blog and see!  I bought every collection and knew from the first that they would be krafty crafting.

I need a few thank you cards for work, so I started there.  Take a peek:


Just a Jillibean Soup flower and a few strips of this gorgeous floral paper.  I cannot wait to play with it more!


I love this sweet gingham, too.  I paired it with more Jillibean Soup--a company that creates fabulous kraft elements.

I took my scissors to a die cut card to set this darling balloon free.  My daughter's first cross country meet is coming up soon and I plan to slip this in her gym bag as a good luck note.

I hope that I can pass on a bit of the kraft love that Stacey and Jen gave to me with all of you!  Have a cute krafty item to share?  I would love to see!

Tuesday, August 23, 2011

Justifying

I love the Justification Statement.  We women do it ALL the time.  We know what we want, but we need to talk ourselves into it with justification.  We want a banana split.  But before we can have one, we need to promise to eat salad for the next 3 lunches or remind ourselves that we have worked out 3 days that week.

Men do not seem to have this need as much as we do.  Maybe they just do not think as hard as we womenfolk.

As I was shopping last week, I fell in love with a black pair of pants.  They fit like a dream and were easy to justify as a "wardrobe staple".  Of course I will wear them for years to come making them worth the cost.

When I walked to my scrap space to start a few thank you cards, I looked in my closet and began to giggle at myself.  It was full of justification.  There were the stamps that I was "totally going to use over and over" (many of which have never been used once).  There were the machines that would allow me to make my own mini albums, emboss, die cut, laminate, and more.  Ones that I would allow me to make embellishments--if only I could stop myself from falling in love with premade ones.  Each machine is fabulous, but they cannot use themselves!

So I pulled them out and got to work.  Stamps.  Embossing folders.  Dies.  Tape.  Punches. 

I made a batch of cards:


The paper and tape are Pink Paislee.  When they debuted the tape, I fell in love and had to have it.  It gives such an easy way for a strong graphic look.  I used my Cuttlebug to emboss and to cut using Spellbinder dies.  I forgot how much fun it was to crank that handle.  I love the extra texture of those dots!  I must confess that I do not remember who the stamp was by.  It is from a series with friendship, congrats, and love.

Making truth out of my justifications was a great exercise.  It felt so good to live up to my promises to myself.  And it felt great to remember how much I enjoy using different items in my scrapping.

Take a look around your scrappy space and see if you have a few justifications lingering in there that need some love and attention.  And if you don't, stop back and tell me your secret!

Sunday, August 21, 2011

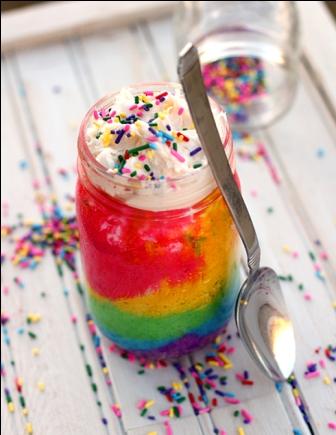
Taste the rainbow!

Remember that commercial slogan?  It was the first thing that came to mind when I first saw this picture on pintrest:


The vibrant colors grabbed my attention.  Isn't it gorgeous?!  I immediately pinned it to my color board.  I knew it would inspire me to create.  But then I kept coming back to it.  Kept thinking about it.  Wondering how to make it.  Did they bake in the jar?  
Finally, I followed the link to a link to the recipe.  It was posted on a site called Babble along with a number of other cake in a jar recipes.  As I read through, I discovered that the rainbow cake was, in fact, cooked in the jar.  But I also read a number of comments that indicated a problem with it cooking evenly.  I was disappointed.  

On the bottom of the post there were a number of other cake jars.  Just out of curiosity, I clicked on another.  Reading through it I discovered that this recipe was not cooked in the jar, but crumbled and layered with icing.  I was thrilled!  My mom, my kids, and I grabbed a white cake mix and some food coloring and got to work making our rainbow colors.  We baked, crumbled, and layered with love.  

Absolutely delicious!  And really pretty!  We popped them in the fridge and enjoyed them for days.  It was such fun to grab an individual jar.  They actually stayed fresher than a regular cake.

Tomorrow is the first day of school at our college and I am celebrating by bringing lemon cake jars to some of my colleagues.  I know we will all need that extra sugar kick to deal with the dramas of getting a bit over 12,000 students on the path to success.

Ok, so I know that this is not a scrapping item, but I could not resist sharing.  After all, who loves cool things to do with friends and family more than scrappers?  And when you can get gorgeous, colorful photos to add to your next page on top of it?  SCORE!

Friday, August 19, 2011

A Different Perspective

Happy Friday everyone!  The weekend is upon us and that means it is time to scrap!  I wanted to share a layout with you today and inspire you to try products in a new and different way.  For example, use a masculine product on a feminine layout.  Turn ribbon into a flower.  Use a bunch of journaling cards to make your own patterned paper background. 

It is no surprise that I am a huge Webster's Pages fan!  I realize that the bold and patterned A-sides sometimes scare people off!  Some people are not comfy with a shabby, romantic, layered style.  That is okay!  Embrace your style with paper you wouldn't normally use!  It stretches your creativity and takes you out of your box!

I used Webster's Pages Yacht Club to create this layout in my clean and playful style!  I used flowery elements carefully and was sure to include lots of B-side patterns!  I even made a Princess Petal flower into a sun!


Not would you would expect, huh???

What will you look at from a different perspective today?

Wednesday, August 17, 2011

Glubers~have you tried these!!


The brain child of Cosmo Cricket ~ a big giant pad of sticky glue.  Wish I had thought of it!   It will hold material , trim or ribbon and makes beautiful flowers.  It is not just for scrapbooking ~ necklaces, attach them to handbags, totes, aprons and so much more.  I'm going to take  you through the process of making a flower, out of material, using Glubers!!  Here we go~


I used a strip of fabric 44" long and 2" wide.  I folded the fabric in half and sewed a loose stitch all the way down the fabric.


I then gathered it up by pulling the stitching.  Gather it all the way down.


When that is done start wrapping the fabric around the large {3"} Gluber.  The stitching to the inside and ruffle to the outside.  Keep going around the circle until the Gluber is covered by the fabric.  Fold in the end of the fabric into the center of the flower.  Sew on your center {button etc.}


Take the backing of the Gluber off and stick the flower on a piece of felt or material.  Cut around the Gluber to make the back piece a circle.  You are ready to sew them or pin them to your apron, tote ~ what ever you like. 


Finished flowers and this is where I used them~


I have been making my granddaughters head bands ~ can't seem to stop!! Thanks for stopping by today and have a wonderful day!!  By: Connie Mercer/Street Writer

Thursday, August 11, 2011

Staff Call!

Are you ready?


ScrapStreet.com Magazine and GingerScrapsStreet Magazine are looking for a few new staff members.  Do you have a passion for all things scrapbooking? Do you love sharing new ideas and hot trends with your fellow scrappers? Are you interested in increasing your online presence reaching thousands of
subscribers each month? ScrapStreet.com and GingerScrapsStreet Magazines are accepting applications for staff writers.

The Job:
ScrapStreet publishes a quarterly ezine with thousands of subscribers and a 6 year history. We love finding and showcasing talented scrappers and beautiful products. We launched GingerScrapsStreet Magazine in January 2011 as a monthly sister magazine to increase our digital and hybrid presence.
If you are selected for our staff, you will write articles for either or both publications which will include selecting and requesting the work of designers, combining the work into an interesting article, and meeting
your deadline. You will also contribute to our blog.  It is an excellent opportunity to increase your visibility in the scrapping community while having fun.

To Apply:
Send the following to digistaff@scrapstreet.com
1. contact information
2. a short statement of why you are interested in joining us.
3. a link to your blog
4. a link to your gallery
 

Tuesday, August 9, 2011

Are you pinning?

Ok, so maybe it is a silly question.  Maybe I should ask, "What are you pinning today?" 

But, just in case, you are not yet totally addicted, let me be the devil on your shoulder.  You NEED to pin.  Honest.  What is this pinning I speak of?  It is pinterest.  You create your own inspiration bulletin boards housed entirely online.  You can have them for pretty much anything--shoes, design, cooking, and (naturally) scrapping!  Think of the Oprah dream board only without you needing to grab your scissors and a batch of magazines.

And, since you can follow other people's boards, you are constantly finding new ideas to like or to repin on your own boards.  It couldn't be easier.  You can update your board in just a few minutes.  (shhh do not tell them about getting addicted to the pretties yet).  You can pop by my boards here.

I am working on a makeover for my personal blog.  My life has changed a good bit lately and I need to refashion my blog to match.  While working on the redesign, I began searching for some pinterest buttons, badges, and blinkies.  I thought I would share them with our ScrapStreet readers in case some of you are pinning and looking for just the right way to link people to your board.  I did not design any of these--simply found them, loved them, and thought I would share them with all of you.  If I design a few, I will stop back by with them.

1.  For the addict:


2. Want a little button to go with your facebook and twitter ones?  How about one with love:


3. A nice and simple bulletin board look:


4.  I thought this owl was just too cute.  Pinning is wise, see?


5.  The question of the day:


6.  The answer to "Hey Mom, whatcha doin?"


Want me to follow you?  I would LOVE to!  Shout back in the comments with your link and I will be happy to join in.  I bet you have something fab that I really need to repin on your boards!

Monday, August 8, 2011

I've Got the Card Mojo

Hello everyone!

So this past week I have had a huge kick in the butt mojo spree in making cards. I went three days where I just couldn't stop. But I can't make layouts for the life of me. Have you gone through that before? And it was like everything was working. I had the right product and papers. I even used some sketches and the cards just oozed out. I love it when that happens!

Supplies: Paper: Pink Paislee, Cardstock: Bazzill Basics Paper, Flower: Prima Marketing, Pearls: EK Success, Tool: Electronic Cutter: Silhouette SD

I love my Silhouette. It makes my cards look pretty and much more detailed. And the great thing is it only a few seconds to load the paper and have it cut. Card Making Tip: Need to whip out a card but seriously having a hard time figuring out how to make it pretty? Use your die cut machine (if you've got one!)  The Silhouette store has some beautiful, intricate card shapes that make it look like you spent hours on your cards.

Supplies: Cardstock: Bazzill Basics Paper, Flower: Prima Marketing, Washi Tape: Hambly Studios, Ink: Versafine, Tool: Stamp: Hero Arts

For this card I used a sketch. But I also threw in another fun technique. Do you have Washi Tape in your stash? When I first got some, I had no idea what the heck to do with it. My mind could not fathom that there was something more to do with this product besides just use it as pretty tape. But check it out! Card Making Tip: Washi Tape is the perfect size to add fun, thin, patterned strips to your cards. Simply tear it off and adhere and you're done!

What other card making tips do you have your sleeve? I'd love to hear them! And if you are feeling the itch to make some cards, why not think about contributing to our current call for Card Corner? Use alphabet of any kind that is similar to Thickers or letter stickers on your card. It's for our October issue so holiday cards are the theme! Email your submissions to me at melissa [at] scrapstreet [dot] com by August 10. Can't wait to see what you send me and, you never know, your fabulous creation could end up in the best online magazine viewed by millions around the world. :)

Happy Card Making!

Melissa