Showing posts with label clearsnap. Show all posts

Wednesday, September 26, 2012

Multi Media altered notebook

Lately I have been really into mixed media. I guess it is a trend now and I'm not the only one. Nevertheless, I thought I would share a mixed media project with you.

This is a notebook that I got for a quarter at a back to school sale. I covered it in a couple layers of Gesso, then pressed the crackle molding mat into it. After that I sprayed it with the new Stephanie Barnard Dye ink in Banana, then ran the Banana ink pad over the texture for a little more definition. The muslin was hand cut and then stamped with the Rollograph and three colors of stephanie Barnard dye ink. The chipboard was gesso'd then sprayed with Dye ink in Orange, then inked with some brown chalk ink. The trims are Hydrangea Hippo.

I have also been using modeling paste. The texture on the background probably would have worked better with that, but I didn't have it at the time. It's thicker than gesso and holds texture and design well. I have been using it with stencils to create an embossed look.


Tuesday, September 18, 2012

Going hybrid

Hello ladies. Nicole here with a few hybrid layouts! I wanted to step out of my comfort zone a little bit this month so I decided to dabble a bit with elements from Glitz Designs digital kits! While scrapping, I decided that it was quite fun and so easy! I simply printed some digital elements on white cardstock and cut them out with scissors. Here are both of my layouts using digital embellishments! You can hardly tell the difference from paper vs. digital. I love them both and hope that you are inspired to try Glitz Designs digital kits!
Supplies used: Glitz Design: Patterned papers (Afternoon Muse, Pretty in Pink) Glitz Design: Digital elements from the Happy Travels Paper Kit. Other: Ribbon (leaves): May Arts Flower: Zva Creative Jewels: Zva Creative Paint: Tattered Angels Spray mist: Clearsnap Pen: Creative Memories Corner rounder: Creative Memories Adhesives: Creative Memories
Supplies used: Glitz Design: Patterned papers (French Kiss, Pretty in Pink). Digital embellishments from the Pretty in Pink Collection. Other: Patterned transparency: Hambly Ribbon (leaf): May Arts Burlap: May Arts Flower: Zva Creative Pearls: Zva Creative Spray mist: Clearsnap Corner rounder: Creative Memories Butterfly punch: Jenni Bowlin Adhesives: Creative Memories Thanks for visiting today. Hope you have a fantastic day!

Thursday, August 30, 2012

A coloring book for Edward

Hello everyone. Nicole here. Lately, it seems like all Edward wants to do is sit on my lap so that he can command me to draw him pictures of cars, turtles, mommy and daddy. The list goes on :) I actually love this. I think that I might have a little artist so I'm doing everything that I can to encourage him to find his creative side.
Since my son loves to draw, I decided to create him a fun coloring book using my Bind-it-All and Clipboards. This was such a quick and easy project and Edward loves it! Go ahead and try creating one of your own. I bet your kids will love it too!
Supplies: Zutter: Bind-it-All Zutter: 6x6 Clipboard Wood Zutter: 1" Antique Brass Owires Other: American Crafts: Chipboard Alphas Clearsnap: Smooch (Mocha) Clearsnap: Mix'd Media Inx (Patina, Truffle) Clearsnap: Glue Gloss

Sunday, July 29, 2012

Recycled altered box k-cup holder

Today I wanted to share a little project that I made using some packaging from some Prima flowers. They came in this cool plastic box, which I saved. I decided to use it to make a gift of K-cups for someone. 6 k-cups fit in here just about perfectly. (I added a little padding in between the bottom and top layers to fill it out better)
The paper, chipboard, button and pins are My Mind's eye. I used my Lacy Labels cricut cartridge to cut out the scalloped circle and the green detail. The stamps are Joy's Life, stamped with clearsnap stephanie barnard dye ink. I then colored in the image with some prismacolor markers.

Thursday, July 26, 2012

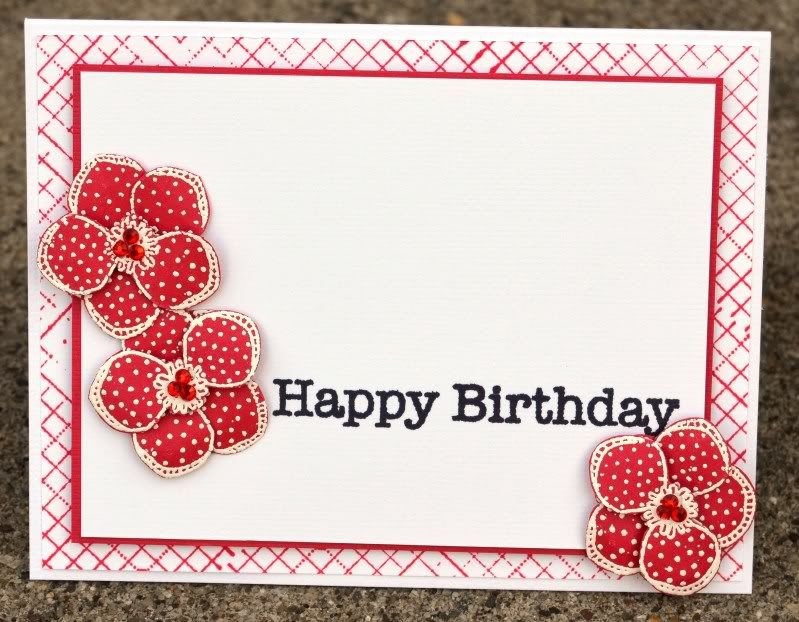
Stamped and Embossed CAS card


You may or may not know that I tend to like the clean and simple (CAS) look. Sometimes I feel like it is a cop out, making a card with so much whitespace. This card is an example of how a CAS card can still have a lot of work and technique behind it.

I used a background stamp for the 'gingham' panel. The background stamp that I used was checks, so I tilted it a little to get the skewed look that I wanted. That meant that I had to tile the background stamp, because it wasn't large enough to cover the whole panel once it was tilted.

For the flowers, I stamped them with clearsnap clear embossing ink, then heat embossed them with white top boss embossing powder. I stamped and embossed 6 flowers, then I cut three of the petals out of 3 of the flowers and layered them with foam tape on top of the other flowers. I used my thumb nail on the back of the petals to create a curved shape. (do this carefully so that the embossed design doesn't come off)

I layered the white panel on red cardstock and then stamped the sentiment in black dye ink from stephanie barnard for clearsnap. Finally I adhered the flowers and added the jewels.

A simple clean card, with quite a few steps and techniques behind it.

Friday, June 8, 2012

Be true to you

Hello everyone, Nicole here. Today I would like to share a fun piece of art I created for my craft room. I received this fun template in my June SFTIO Kit and immediately fell in love! I had so much fun playing with canvas, templates, and paint. As far as the mess involved, it was well worth it.
First, I altered a 5"X7" piece of canvas using a stencil and some Smooch ink. I used a plain marker for the title.
After I finished painting, I let the piece sit for about an hour to dry. Once dried, I popped the glass out from a 5"X7" frame and popped the 5"X7" canvas board behind the frame.
And here is my final project. I just love how this turned out. This really was an easy project and so much fun.
  • Supplies:
  • Zutter: Bind-It-All
  • Zutter: 5"X7" Canvas Artboard
  • Other:
  • Template: Crafer's Workshop
  • Spray Ink: Smooch
  • Pearlized Accent Ink: Smooch
  • Black marker: Ranger
  • Gray marker: Creative Memories
  • Acrylic Stamp: Technique Tuesday
  • Wooden Frame: Target

Wednesday, May 16, 2012

Technique with multicolored stamp pads

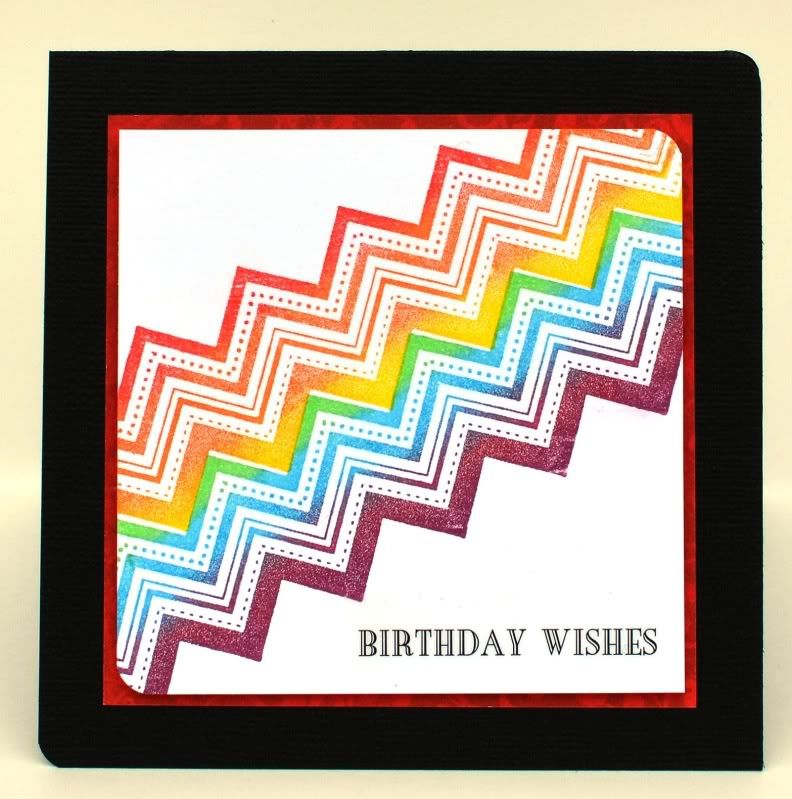
Have you ever gotten a multi-hued stamp pad, or seen one, and wondered what you do with it? I'm pretty sure that there's a way to use just one color, but to be honest, I never tried. When I wanted to make a rainbow on this card though, I thought there had to be a way to use my rainbow ink pad to do it.
This is the ink pad that I have
So, what I did was carefully position my stamp over the red, orange and yellow portion, then dab as I moved the stamp (which is a lot longer than the ink pad) along the ink pad, careful to keep the colors more or less lined up. Then I stamped those three colors before going back for the next three colors. Since there is no purple here, I took a separate cat eye chalk ink pad and applied that over the red ink that was on my stamp from the previously mentioned process. The result? This fabulous gradient rainbow!! I was pretty happy with how it turned out! I can't wait to think of some more stuff to do with this ink pad!