Showing posts with label cards. Show all posts

Saturday, October 6, 2012

Happy World Card Making Day!

A day late...

Well, depending on where you are at. For some reading this post, it was yesterday. For others, it's still the afternoon. (Hello Hawaii!!!)

I LOVE World Card Making Day!

Of course, the writer of Card Corner would say that, right?  While, I was out and about most of the day, I did finally get to my craft area and am creating my happy creative heart out. I love this hobby so much and never want to lose that joy! I am so thankful for days like this when our amazingly, talented, paper crafting community can come together and share our cards.

While I was perusing galleries and Facebook, I came across some gorgeous cards! Some are from designers who are regularly published in ScrapStreet and others are from designers who I haven't had the honor of seeing their lovelies. See below for a few of what I found. Make sure to follow the link to their blogs because these ladies have a TON of inspiration on their blogs.

Designer: Angeline Yong
Her Blog

Designer: Christine Traversa
Her Blog


Designer: Tenia Nelson
Her Blog

Designer: Melissa Elsner
My Blog

Thank you Angeline, Christine and Tenia for, so graciously, allowing me to share your cards here. 

So... dear readers, did YOU get a chance to create any cards? Link up your gallery or your blog in the comments below so the rest of us card makers can come drool. :)

Card Corner Writer
(I'm going to miss ScrapStreet...)


Monday, September 17, 2012

Coloring outside the lines

 
Do you have a rebellious side? 
Me, not so much. 
You'll never find me on a bungee jump. 
I don't have a need for speed. 
While I'm sure the view and the experience is fantastic, I won't be booking any trips to Nepal to climb Mt. Everest. 

While others may live for adventure, I let my wild side out while I'm creating. Now, I don't go crazy and shoot color out of a paint gun, roll around with my body covered in paint,  or throw knives at paint filled, suspended balloons. 
 
But sometimes, it's nice to break the rules a little bit.
 
So for these cards, I stamped these images in black (the large botanical image is from Kaisercraft, the sentiments are from Hampton Art), and rather than color them in, I mixed a little water with some colored ink and splattered. Drip, drip, drop!
 
 
Now, a kindergarten teacher might encourage you to color in the lines, but me--I'm a paper art rebel.  I say "Go for it"!
 
Look for more watercolor techniques in the next issue of Scrapstreet that will be posted on October 1st. 
I'd love to see your watercolor rebellious side!
 

Wednesday, May 16, 2012

Technique with multicolored stamp pads

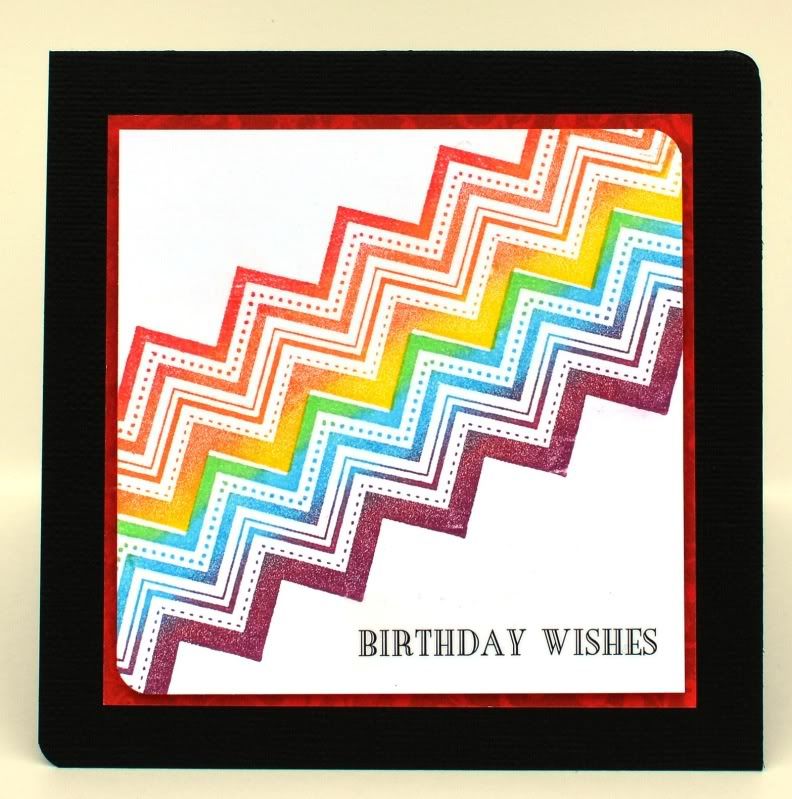
Have you ever gotten a multi-hued stamp pad, or seen one, and wondered what you do with it? I'm pretty sure that there's a way to use just one color, but to be honest, I never tried. When I wanted to make a rainbow on this card though, I thought there had to be a way to use my rainbow ink pad to do it.
This is the ink pad that I have
So, what I did was carefully position my stamp over the red, orange and yellow portion, then dab as I moved the stamp (which is a lot longer than the ink pad) along the ink pad, careful to keep the colors more or less lined up. Then I stamped those three colors before going back for the next three colors. Since there is no purple here, I took a separate cat eye chalk ink pad and applied that over the red ink that was on my stamp from the previously mentioned process. The result? This fabulous gradient rainbow!! I was pretty happy with how it turned out! I can't wait to think of some more stuff to do with this ink pad!


Thursday, March 29, 2012

Why I make cards

Just a few quick pics of this versatile new stamp set called Joyful Jar from Close to My Heart. I also used a doily die from Spellbinders and the Grandma's Doily and Scalloped Circle punches from Fiskars (and a few others tools, punches,  and papers in my stash).


*A quick tip...those itsy, bitsy, teeny, weeny stamps stick perfectly to the top of a glue stick cap. I can stick my finger in the cap and stamp, stamp, stamp!

Now, we come to the reason why I make cards. It was my birthday last week, and this was the card I received in the mail from a family member. This is a beautiful store-bought card, IF YOU ARE A 99 YEAR OLD RETIRED FISHERMAN! 


A beautiful hand-made card can be a gift in itself. 
That is why I make cards.
Send one out that you've made today.


~Kelly

Thursday, January 5, 2012

Card and tag ideas~


Hi everyone~glad to be back and ready to get creative!!!!  This is a tag set I did using the Just My style stamp set by Darkroom Door.  I stamped the image on Kraft cardstock and then cut around it and adhered to the manila tag.   Added some mists and some little extras and the girls are ready!!!


Here is another example using the same stamp set by Darkroom Door.  Again stamping the image on Kraft cardstock and blocking it.  Little extras are added and the girls are ready!!!  These are a couple of quick and easy card and tag ideas~ hope you enjoyed them. See ya soon!!! by: C. Mercer

Thursday, September 22, 2011

Inspired by Dora~

Hi everyone~ I wanted to share with you some cards that I made using, the fabulous, Kraft cardstock.  I first saw a post on here, with fantastic examples ~ so Dora , this is for you.  Your cards were amazing!!!


I used the same supplies on all of these cards. I got my scrap bag out of Jenni Bowlin pattern papers, my new Jenni Bowlin acrylic stamps and some embellishments!!  Kraft cardstock is so user friendly and in my opinion, you just can't mess it up!  Have a great day and see ya soon!  by: C. Mercer

Wednesday, June 1, 2011

1+1 = 3

Julie Ann here with two special projects to share. My article in this month's issue of GingerScrapsStreet Magazine highlights ideas for babies! Here are two extra-special projects that I wanted to highlight on this blog. Check out these adorable projects, and be sure to see more in the June issue in the 1+1=3 article!
 Sweet Baby by  Melanie Kelly

Supplies: Paper: Making Memories, Alphabet: American Craft Thickers, Alphabet Stickers: Tiny Types, Flowers: Kaiser Craft, Jules Gems & Green Tara, Tags: Making Memories, Journaling Spots: Making Memories, Pearls: Kaiser Craft, Punches: Martha Stewart, Friska circle punch, Border Punches: Friska


Design Notes:In this Layout I layered the flowers & papers to give tlhe ayout some dimension, also using the Journaling from the paper range.


It's A Girl by Sandy Ang
 
 
Supply list: Paper: Best Creation, Tags: Best Creation, Stickers: Best Creation, Buttons: Junkitz, Other: paper clip, cord
 
Design Notes: I used Best Creation Safari Boy stickers to create a whimsical altered project.
Using a supersized paperclip, I made this little decorative item for a baby girl shower. It was fun playing the various shapes : from the length of the giraffe's neck, through the swirly stems and circular florals. And it was a moment of pure serendipity when I saw the blue acrylic button with the word pure in my stash. It fit perfectly in the 'belly' of my Mama giraffe to represent the little baby that's coming.

Thursday, March 3, 2011

Photo Taking Tips with a Guest

Hi everyone!

Melissa here with a fun and hopefully helpful post for you.  I've got a friend helping me today. His name is Marco and he is pretty adorable.  But let me first tell you what my post is about today and then I'll let you see his face.

We get lots of submissions here at ScrapStreet with talented designers, such as yourself, that want to be published.  One of the things that magazine staff look for is a well taken photo.  Not only does it help us see your project well but getting into the habit of taking good photos is just something we should all work on.  And when you get one of those wonderful project acceptance emails, we want your project to look absolutely beautiful.

So I thought I would share with you some tips and tricks in taking photos of your projects for submission and also just in general to post on your blogs and in galleries.  Now let me just bring Marco into this now because sometimes we have a "helper" who just can't stand not being the center of attention.


Isn't he cute?  Poor Marco.  He would be our lovely Mich's doggy.  I couldn't help but share this photo with you all as she was trying to take a photo of a card for an upcoming article.  While most of it is blurred I thought you might like the sneak beyond Marco's snout.  Also, I can't really help you when your animal wants to get in the photo anyway.

Okay.  Now let's get to business.

First of all.. everything I'm sharing is done with my little point and shoot digital camera. I am not rich enough to have one of those fancy DSLR's although, I would LOVE to have one someday. Not just for photographing projects but just photo taking in general. So you don't have to have anything fancy to take good photos. You just need to know your camera.

1. Lighting. It is best to take photos of projects in natural daylight but we all the know the reality of this time of year. It's at a premium and when it is there, it's either too windy or too snowy or too something. I relish in my Summer time! So if you take photos inside, find some good lighting. I have two Ott Lites. But you can use any type of "daylight" type lamp.

A note about outside though: Don't use direct sunlight as this will create harsh shadows. It's best in the shade or on a cloudy day.

2. Focus and such. Here's the fun part. On my camera, I use the Aperture setting. Usually it's indicated by an A on point and shoots. Typically on any Aperture menu you will see an 'f' with numbers by it, a box with a +/- and a number and then ISO with a number. Each of this is adjustable while in Aperture mode. Here are the things to know about each.

'f' captures light. The lower the number the more light it will capture. So it's best to have it on a low number while photographing indoors. I have mine on it's lowest setting which is 2.8 on my camera.

+/- adjusts the Brightness. Kind of like when you edit the brightness in a photo editing software, you can do that on the camera. I rarely mess with this one. So I leave it at 0.0

For ISO, this is something you would change depending on the lighting in the room. Mine is always kept at about 100. For anything else, you can make the number go higher if the lighting is low but just know that your photo will be grainier. Some photo editing programs will allow you to adjust the "noise" of your photo but I recommend not messing with it when taking a project photo.

The other item you will want to adjust is the macro setting. My camera has the macro button on top. Next to the button is a flower and a mountain. The flower is the one you want... that is the macro. The mountain you would use for distant scenery.

3. Flash. NO flash. That is all.

4. Background. It's best to take photos of your projects with a plain background. That way your project will pop without any distractions. I have two white 12x12 pieces of paper that I prop for my cards. Then I take my two Ott lites and shine one on the background paper and the other on the project.

5. Take several photos. This is good to do. Experiment. Take them from slightly different angles. Farther away. Closer, etc. Then bring them up in your photo editing software.

6. Editing. There is always something to fix. I use Picasa and Picnik. I usually crop first, adjust lighting a bit, sharpness, sometimes contrast and brightness depending the lighting and then bring it up in Picnik to resize. Photos seem to appear better on blogs at about 600 to 800 pixels. 

Here is an example of how editing can change your world.  Here is a before and after photo of a card I recently made:

Before


After

I hope that these little tips have helped you with your photo taking!  Layouts... well... there are more tips for that but we'll just talk about cards for this post! And if you have any other tips, let us know!  Share your expertise with us. :)

And while we're talking cards make sure you check out the current Card Corner article.  We are featuring Good Luck cards and then mosey over to the Current Calls!  We're looking for manly cards! :)

hugs,
Melissa