Saturday, May 26, 2012

Basically Bare mini album~


Hi everyone~Connie here to share with you a mini album done using the fabulous Basically Bare products!!  I won  a pack of goodies at a Basically Bare class, couldn't wait to dig in!
Most of the mini is made with Basically Bare Products, the chipborad shapes take paint, mists, paper and stay strong.


This is a look at the first three pages and some of the shapes I used to complete the album.  The paper is by The Paper Loft (was in my prize pack, too).  The frames are so neat~wish I had had two sets!!I thought of so many uses for them.


This is the last three pages.  The chipboard shapes come in cardboard, corrugated cardboard, canvas and felt.  The felt and canvas really take on the color, when you use inks or paint.  Great  embellishments that you can decorate anyway to match your paper carft projects!!!  Thanks for stopping by today and I'll see ya soon!!!

Friday, May 25, 2012

Lazy Summer on the River

My husband went camping recently to Peace River which is in Florida with a group of our friends (mostly the husbands).  I never go camping ... well that is not true I did go camping once before I got married to my hubby man, but never again.


I purposely faded out the photo because it was too green for the color scheme I was using.  I used the Paper Loft "Huckleberry Pond" collection.  This paper collection worked out perfectly for my photo. 


I also used the Basically Bare Pennants embellishments.  I love this set because you get banners from chipboard, canvas, felt and acrylic.  I love all the different textures.  I covered the chipboard with the paper loft collection, I painted a dot pattern on the felt and I stamped on the canvas.  I was very happy making that banner.


Basically Bare has a really cute set called celestial shapes that have clouds in the set.  Unfortunately for me I didn't have any at the time so I compromised by using the tree top from the Basically Bare Happy Tree embellishment set.  I stamped my felt cloud then I glimmer misted it with Tattered Angels.

That is it for now, happy scrapping, and hope you have a Lazy and Happy Summer.


Thursday, May 24, 2012

do it yourself chevrons


10 things about my scrapbooking...

I am a simple scrapbooker.

I tend to use lots of photos on my page.

I like bold, vibrant colors.

I prefer solids and textures over patterns.

I like to mix and match alphabet stickers.

I don't buy a lot of embellshments; I'd rather make them myself.

I like my pages "flat"; 3D and bulky aren't for me.

I scrap in 12x12 size.

I prefer to buy paper in stores rather than online;
I like to touch and see it.

I am inspired by everyday things...
shower curtain patterns, song lyrics, artwork, recipe photos.


I tell you these things, because as much as I love to read about new scrapbook trends, I don't easily jump on the bandwagon.
However, I must say that I have been admiring
all of the designs with chevrons.

So, I wanted to share with you a SIMPLE way to
create your own chevrons.


I started with a 4x12 sheet of paper and scored it at 1 inch increments.

I've found that by pulling the cutting bar off my paper trimmer, I can make great score lines by following the groove with a stylus (a pencil works too if you remember to do it on the backside of your paper).


Fold the paper in half, and then in half again along the score lines.


Place the long twice-folded strip into your paper crimper on a slant.


Squeeze hard as you crank the paper through
(remember you are crimping four layers of paper)


Open up your paper and you've got CHEVRONS!


Add some painted doilies, paint splotches, photos, bright paper (dug out the Paper Edgers to make the edges "fancy"), and
alpha stickers to create one hip and trendy page.


So what is your scrapbook style?
Are you hip and trendy?

~Kelly

Tuesday, May 22, 2012

Double Page My Little Shoebox layout

Today I wanted to share with you a double page layout that I created for My Little Shoebox using their Up in the Trees collection.

I don't often do double page layouts, but I had a ton of photos from our egg hunt, so I kind of needed to make this one into a double. For the center strip, I wanted to break up the yellow, but then the white cardstock looked too stark, so I used a graph paper background stamp dipped in glimmer mist to create a subtle effect.

Wednesday, May 16, 2012

Technique with multicolored stamp pads

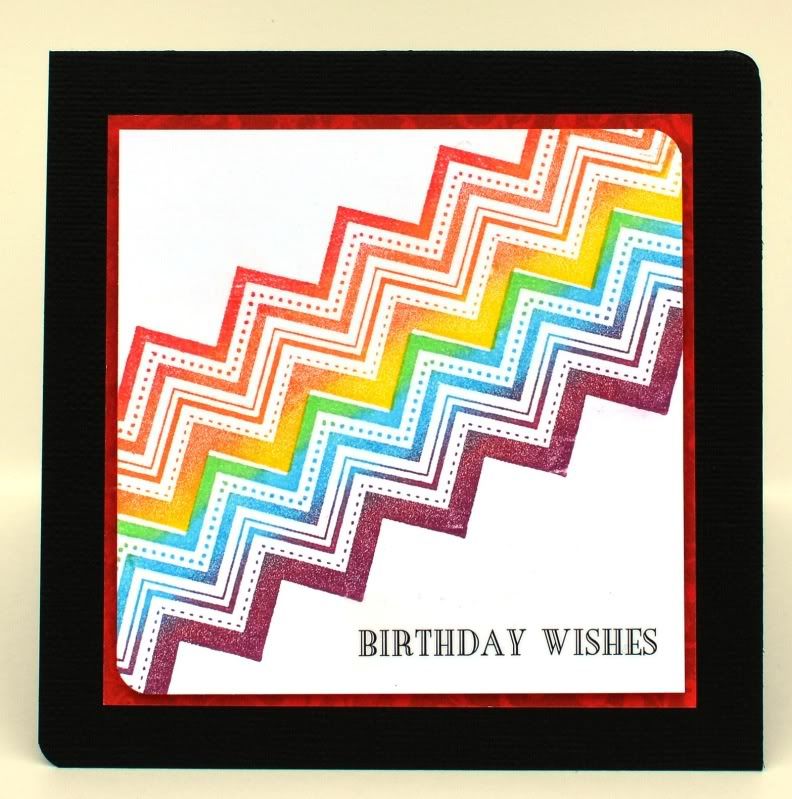
Have you ever gotten a multi-hued stamp pad, or seen one, and wondered what you do with it? I'm pretty sure that there's a way to use just one color, but to be honest, I never tried. When I wanted to make a rainbow on this card though, I thought there had to be a way to use my rainbow ink pad to do it.
This is the ink pad that I have
So, what I did was carefully position my stamp over the red, orange and yellow portion, then dab as I moved the stamp (which is a lot longer than the ink pad) along the ink pad, careful to keep the colors more or less lined up. Then I stamped those three colors before going back for the next three colors. Since there is no purple here, I took a separate cat eye chalk ink pad and applied that over the red ink that was on my stamp from the previously mentioned process. The result? This fabulous gradient rainbow!! I was pretty happy with how it turned out! I can't wait to think of some more stuff to do with this ink pad!


Tuesday, May 15, 2012

Dog Day!

Being a huge dog person I have tons of pictures of our 6 wacky dogs and with that said  I decided it was time to do a few dog layouts.  I knew I didn't want to use a dog specific digital kit so I went kit shopping.  This kit yelled out "pick me"!  I found this kit at Flutterbye Faery.


I decided on these 2 dog pictures and got to work.  Such an amazing way to create a page.  Digital makes it so easy to try different looks and play with different papers and embellishments.  I am very happy with how the pages turned out. 


This is Snicker, she loves laying in a laundry basket filled with dirty laundry.


This is Stanley, he got a Twinkie out of the pantry and was very proud of himself.


Did you notice that the kit is themed All Girl?  Since I didn't use it for any girly pictures I think it could be re-named to Dog Day!

Happy Crafting!
MelissaO

Monday, May 14, 2012

Jenni Bowlin Studio's chalk board and easel~


Hi everyone~ I wanted to share with you this re-purposed item {the bicycle frame} , with a new item~the Jenni Bowlin chalk board and easel.  I picked the frame up at a junk store, cleaned it all up and added it to the chalk board as an embellishment, not as a frame.  I used Helmar 450 Quick Dry to adhere it to the chalk board. 


I also added a little photo banner at the top of the chalk, of my sweet "grands"!   A great gift idea or home decor piece.  Have a wonderful day and I'll see ya soon!!!