Thursday, February 10, 2011

Accessorize with...Paper?

One of the things I love about papercrafting is that you can make almost anything out of paper -- even jewelry! In fact, over the past few weeks, I'm seeing paper jewelry ideas all over the blogosphere. Here are a few I wanted to share with you:

Still searching for that perfect Valentine's Day gift? Check out this little paper cuff bracelet on Etsy -- so fun!


And for a completely different take on a bracelet, check out these altered bangles from the Cosmo Cricket blog:


And here's a little tutorial on how to create a paper brooch from Paper-Source:


How about a cute necklace made from your paper scraps? The DIY wedding blog shows how to make one.


So next time you spot a piece of patterned paper that's just your style, try making an accessory you can wear outside your craft room. Maybe you can even make a gift for that "fashionista" friend!

Tuesday, February 8, 2011

Using What You Have

I collect boxes and baskets! I just can't help myself! When I receive packages
in the mail, boxes that are from Christmas or birthdays, baskets leftover from
gifts or garage sales, I collect them all!! I know when I see a good box or basket
that there will just be a fabulous way I can repurpose them and use them for
decoration, storage, or even better...decorative storage!!! Today I want to share
with you a simple square cardboard box that I repurposed for extra storage in
my scraproom. All it took was a little decorative pattern paper, ribbon, and lace.

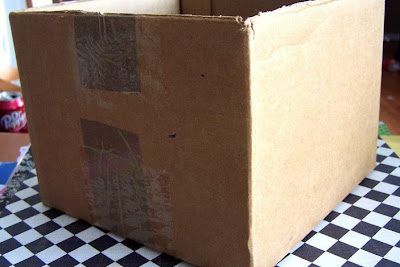
I first covered all four sides of the bottom half of the box with pattern paper
using a good craft glue. I covered two opposite sides first (ex. North and South
sides of the box) and wrapped the paper about and inch over the corners to
cover the corners of the box. Then on the two remaining sides (ex. East and
West sides of the box) I cut and glued the paper to fit perfectly from edge to
edge. This way the corners of the box are covered yet the seams are still
directly on the corner edges.


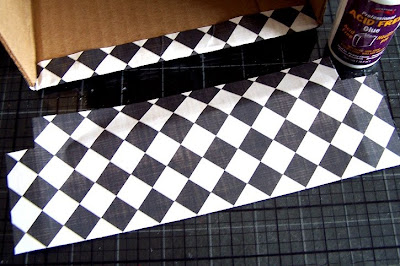
Next, I covered the top half of the box using the same technique. The only
thing I did differently here was to cut my paper about an inch taller than
what I needed for the box so that I could wrap the extra paper over the
top edge of the box to cover the raw edge. (NOTE: the lid flaps of the box
have been cut off to leave the top of the box open for storage)


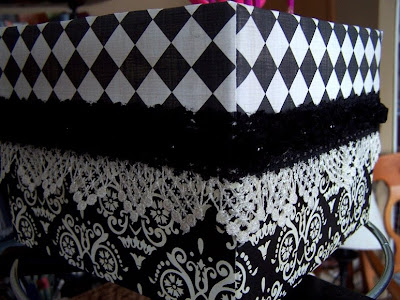
Then I added lace and ribbon as a border to cover the line where the two
pieces of pattern paper come together.


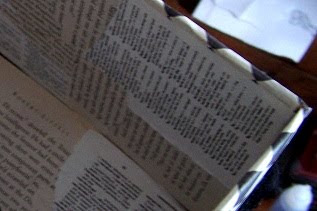
Lastly, I covered the inside of the box with vintage book and dictionary
pages. This is a very easy way to cover the inside of the box. There is no
rhyme or reason to the design and I just love the end result. I have seen
many people cover the back of antique shelves and cabinets with this
technique, and I figured that if it was good enough for an antique then it's
definitely good enough to finish the inside of my box!! You could also use old
newspapers, music sheets, or just about anything with black and white print.


I now use this decorative box to hold the items on my scrapping desk that I
use on a regular basis like my ink, scissors, adhesive, etc. These items used
to take up valuable space on my desk and now I just toss them into the box
until I need to reach for them again. There's no more searching under stacks
of paper and stickers trying to locate where I tossed my tape runner or
scissors. I also have another box that I repurposed and decorated to hold
my scraps and I just file them by color inside of the box.
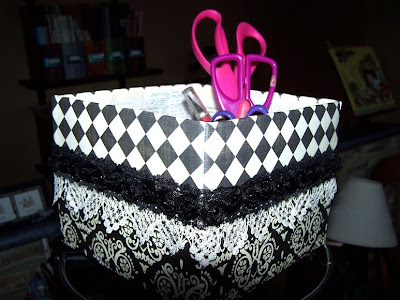


I love to repurpose boxes and baskets for my scraproom storage. The best
part is that you can decorate your box in any style or color to match any
room and decor in your home. I've even created storage boxes for my
daughter's bedroom closet and toy shelves. The possibilities are endless!

I hope you'll give this a try! Have a wonderful Tuesday! -Sarah

Monday, February 7, 2011

Inspiration and Getting from Memory to Layout

Inspiration can be a very elusive thing.  Since, discovering digital scrapping in 2009 I have learned a lot but  I still consider myself a bit of a novice.  I struggle with inspiration and sometimes lean on templates for help.  Having no formal design training...except elementary school art...I do not feel bad about this.  I am still very pleased with the layouts that I make.  For me whole point scrapping is to preserve memories.  So getting from memory to scrapped layout is a rather free and loose process--template, page map, quick page, or original creation it does not matter to me.  Below are some of the resources that I use to start my layouts...I hope you find them helpful.

Page Maps:  Page|Maps Blog is a great resources for page maps and inspiration layouts. All sketches (maps) are free and the blog is updated regularly.  Here is an example of one of the maps available.

Gallery Inspiration:  I find that sometimes the best inspiration for a layout is browsing online scrapping galleries.  I frequent DigiShopTalk, Scrap Orchard, GingerScraps, and Scrapable.  Each one of these galleries provides a Search feature.  So if you have a specific topic that you want to scrap...just look it up to see how others scrapped it. Browsing a gallery or two may give you that creative spark you need.  But don't forget to credit the original layout in your credits if you 'lift' a layout from a gallery...good manners and also a big compliment to the original artist. Gallery browsing also helps me find digital goodies.  I can shop numerous stores at one time...that is if credits are present in the gallery uploads.

Templates:  As I admitted above I love templates.  Some scrappers feel guilty for using them...they feel they stifle the creative process.  For me they are the springboard that I need to get started.  Remember that templates are just a starting place.  You can delete layers, add elements that the template does not 'call' for, and really make the design your own.  So don't let the template 'stigma' take away the usefulness of these design tools.  Take a look at a recent layout that I made using a Simply Yin template  for my Project 52.  The template is basic giving only photo placeholders and drop shadows for the photos.  I embellished and journaled as I wished.


Digital Supplies: Kit:  Sweet Siblings by Stacy's Backdoor Door Designs and Sarah Bennet  (no longer available), Template: Template 186 by Simply Yin (SimplyYin Blogstore), Software: Adobe Photoshop Elements 9, Fonts: Impact Label Reversed, Underwood 1913.

Design Notes:  I am loving Project 52.  The details of our life that are being captured are great.

Journaling:  Week four was another great one here in Thompsonville.  Ella continued to walk more & more on her own.  This mean more exploring & learning about what is OK & what the big NO-NOs are.  Travis surprised Ella & I with fried pork chops & gravy for supper one night...might I say that man is an artist with a frying pan!  Later in the week Ella & I went with Nana & Shannon to Cracker Barrel.  While there Nana gave Ella coffee for the first time...she was not impressed at all.  Nana also ate lots of cherry pancakes & put five pounds of sugar in her coffee...wonder if the the dear Doc was watching?  Later that day I put together Nana & Shannon’s new kitchen island & Ella rode around in her wagon (Powered by Nana & Shannon).  Travis, Ella & I also found a new restaurant that we really enjoyed...Azariah’s.  Travis had Shepherds Pie for the first time. I made some the next night and he promises mine tasted best...he is such a sweet Husband!  Speaking of firsts Ella also had a first at Azariah’s...cucumber.  It was a hit!  Since, Ella is walking so well we decided it was time to put the Chicco walker away. It was a favorite for a while but Miss Ella just no longer needs it Sunday Travis surprised his girls again...pancakes for a second week.  We are getting so spoiled.  Then Ella took some time out to help me be the Marsupial Muffin Makin’ Mama...notice how she is inspecting my work over my shoulder.  One of her favorite thing to do is to come up behind me in Travis’s arms & then flop over onto my back.  Just like Yoda & Luke from Star Wars! 

Miss Ella also had one other first this week.  She instructed me to let her drink form a Big Girl glass with a straw.  She did great & there was no mess!  Oh & check out that pic of her playing with my heels.  Those are the shoes I wore at the Wedding.  She fished them out of the closet & proceeded to try the on.  She is growing up too fast. And on other Kodak moment checkout Miss E using the mouse (bottom left).  She is on her tip-toes sliding the mouse around & watching the screen!  Our Little Genius!  What a great week!


Challenges:  Another creative way to find inspiration is via challenges.  I recently started participating in my first ever Progressive Scrap.  This is where the challenge leader gives specific instructions on what to add to your layout in steps...you interpret these instructions and go from there.  Thus far it is a neat experience.  There are also challenges that are more topic specific...such as the Out My Window Challenge hosted at Scrappin Digi Kreations.  This challenge follows the same subject (person, plant, etc.) for twelve months.  You are able to note the changes over time...very cool idea.  I am doing our yard...we recently moved and the yard needs some work.  It will be neat to track it over the coming twelve months.

Hopefully the next time you are hitting that proverbial creative wall one of these suggestions will help get you over the hump!

Sunday, February 6, 2011

An angel moment

Ever have a day where you really need a nice note?  Just a little something that perks you right up?  One of my friends calls these angel moments--a time when God uses a random and unsuspecting person to deliver a much needed smile.  I love that description.

I spent the entire week sending out "Cease" emails to various sites.  For some reason, a person using the name GangaParker decided to take our freebies and those from many other designers, download them, and then upload them to many other sites in direct violation of our terms of use.  For those of you who might be new to the digi scrapping world, please know that this is illegal.  I have the right to give away my work for free--you do not.  You may use them, but NEVER upload and share any designer's kits.

In the middle of tackling this mountain--each kit posted in more than 25 places--I received the nicest email from Savannah O'Gwynn from the challenge blog All Things Unity.  She wanted to ask if it was ok if she used one of our freebies to make a graphic for her challenge this week--with appropriate credit this week.  Savannah showed her appreciation (as do all of  you who are kind enough to comment) for the hard work and talent that our designers share with all of our readers.  It really made my day!  Thank you so much Savannah!

As a matter of fact, I appreciated it so much that I immediately offered to share her challenge with all of you.  Here is her graphic using my Sweet Sunshine kit:


The challenge is easy enough since these stamps totally rock!  Want some more inspiration?  Take another look at our article on Unity Stamps in our January Issue.  I think I will pull out some of my favorite stamps and play along.  I love a good challenge and how can I resist one from my angel?

Want to join me? 
 

Friday, February 4, 2011

Using Actions with PSE9 to make your photos really POP

Good Morning Everyone
Jodi here today sharing some of my secrets with you
on how to make your photos really POP

I am relatively new to digital scrapbooking, but i am a keen ametuer photographer. So I thought i would share with you how i make my photos really POP using Actions for Photoshop Elements 9.


This is a photo that was taken by the local paper at the School Fete recently...
Its a lovely photo,
but a little dull and the background is a bit ugly.

Im a huge fan of Actions.  Rather than playing with lighting, contrast and colour ourselves, we can down load free Actions, or purchase them from Photographers.

So here is the original photo


I opened PSE9
and i have already a set of actions pre loaded into my program.
I purchased these actions through a photographer
that promotes his photography on FACEBOOK.
Its amaising what you can find on Facebook!

So I have loaded them up into the program
and i just click one button

You can see just a slight adjustment in this photo.
There is added contrast and the skin colour isn't as yellow...


Here is another type of action where there is a more old fashioned
finish to the photo.
This action is actually called Tombstone.... very fitting!!!


But this Black & White action is the one that i find i use the most.
It has added contrast.
The black is black and the white is white!!
I love that it really brings out the subjects in the photo and you dont even take any notice of the background.


Here is how i have used them in layouts....
Here is my favourite Black & White Action
"Fly Free"


Here is my favourite Colour Action
"Fete Fun"


And here is another Back and White Action
using January's Free Digi Download from Gingerstreetscrap Mag.
I love this line.....
"Snow Fairy"


Thursday, February 3, 2011

10 More Days Till...

...Valentine's Day!!!

And I don't know about you, but I LOVE to make this day special for my family. We usually begin the day with homemade buttermilk pancakes in the shape of hearts of course, strawberry milk, sweet place cards with a love note inside, and plenty of kisses. Well, if you are not in the same state of jubilation as I, I have just the remedy! These pics are sure to inspire you...


Aren't some people just amazingly talented! Well, so far I was very inspired by the pic of the sofa table with the XOXO's framed. The designer used marbles, but I liked the idea of paper rosettes. Here is a look at my finished project...

Like I said, 10 more days...hope you are feeling a bit inspired now!!

Frances

Tuesday, February 1, 2011

Inspiration: Color

Although this time of year can be dull and gray in many parts of the world, there is still so much color inundating us each day. However, even with all that color do you find yourself at a scrapper's road block when you sit down to put a card or page together? Or, you have the perfect idea in your head, but it just doesn't translate well onto your pages? I can definitely raise my hand to both of those! Color doesn't come easily for me for a multitude of reasons. I love looking at pages that have colors and patterns I would never think to put together and those go straight into my "favorites" folder to look back on!

Another remedy is going online to find color and inspiration at so many different sites. My favorite for color inspiration is definitely Creature Comforts. They make it so easy that all you need to do is click on the link on the right labeled "color crush" and this will take you to all their posts that feature color combos. Brilliant, right?! As you scroll down you can get visuals, plus the color combos that they put together for those photos. Some of my favorites are below.


*All photos courtesy of Creature Comforts Blog.

Another incredible feature on their blog is the ability to browse their posts by color. I mean how much more simple can you get?! And for those of us who have no idea where we might want to start color wise then this is perfect! And the images alone give you enough inspiration to start and go crazy with color! I've been on a BIG yellow kick recently so this photo really made me stop for a while:


I love their site for inspiration and definitely recommend it as a starting point whenever you find yourself looking at photos and not quite sure what direction to go in for color. And I'm a sucker for a good block design and I love how they have their photos arranged like that-appeals to my linear side! I go there daily for general inspiration, but most definitely for scrappy inspiration as well!

For those of us tackling the winter blues (and grays, and white, and well, I could go on) then a boost of color is just what we need right now!